Meet the Author

Artist | Owner of Squishing Paint | Educator - Sara brings over 40 years of creative experience, a decade of specializing in acrylic painting, and a passion for guiding new artists as they embark on their own artistic journeys


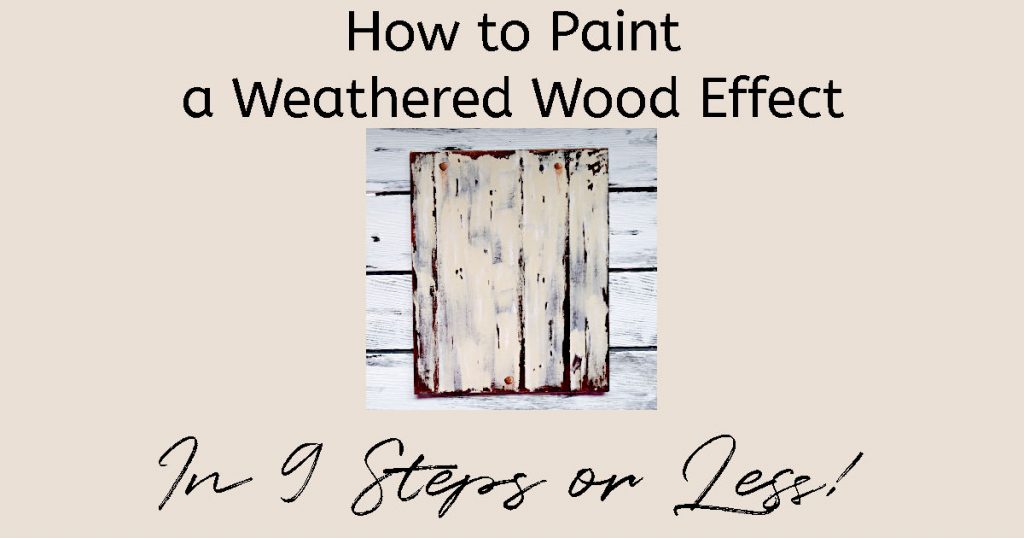
With just a bit of paint and petroleum jelly, you can create a rustic weathered wood effect that is customized to your home décor!
Creating an aged wood finish is super simple if you’re willing to experiment a bit. (Don’t worry, we won’t be using any electrical currents, while lightning is flashing outside of our castle tower laboratory, mwahahahaha!)
You really only need a few supplies, many you probably have already, to achieve the look of old worn wood.
The Beauty of Weathered Wood
There is something so homey about wood that has peeling paint, dings, and scratches. It gives any area an immediate feel of coziness like a well worn blanket. As someone who owns a lot of antiques, it’s the imperfections that give character (no, I most certainly did NOT scratch a sketch of a kite into the tabletop when I was a young whippersnapper… *runs and hides*).
If you are a fan of rustic home décor, knowing how to paint a weathered wood effect is going to be so useful to you and possibly save you some serious cash!
Worn barn boards or sun bleached drift wood work exceptionally well in home décors that focus on farmhouse, shabby chic, cottage/beach cottage, and log cabin styles. The one thing that all of these different styles have in common is that they embrace the “well-loved/lived-in” interior design look.
Remember, back in the 50s, when people used to slipcover their furniture in plastic? Everything seemed “just so” and looked like you shouldn’t even blink, let alone shift position while sitting! Well, rustic décor is the exact opposite of that.
Plaid, brushed metal, quirky pieces of furniture, that are used for something other than what they were made for, and, of course, weathered wood all work perfectly together to create a comfortable “come on in and take a load off” look and feel to your home.
The aged wood look can be found as picture frames, tables, mirror frames, and, you guessed it, as the foundation for many different kinds of artwork.
Ideas for How to Incorporate a Faux Aged Wood Effect in Artwork
I have seen lots of different ways that artists have used a worn wood effect in their artwork. It spans from using it as an element in the actual painting to using it as a background and edging around the main subject of the painting.
Where a faux wooden finish really shines, though, is on artwork that has a whimsical feel to it. Some painting ideas, where it would work perfectly as a background, are:
- Welcome signs
- Cute retro Farmer’s Market signs for a kitchen (you know the ones, “Apples $1” with a basket of apples, as an example)
- Barn animals (roosters, cows, chickens, etc.)
- Flowers (sunflowers, daisies, etc.)
- Buildings (barn, country cottage, henhouse, etc.)
How to Paint a Weathered Wood Effect
If you’re into the weathered wood look, you’re going to love this little practice piece. In the end, you’ll have a wonderfully rustic background for a future project and I’ll even give you some ideas at the end of this tutorial.
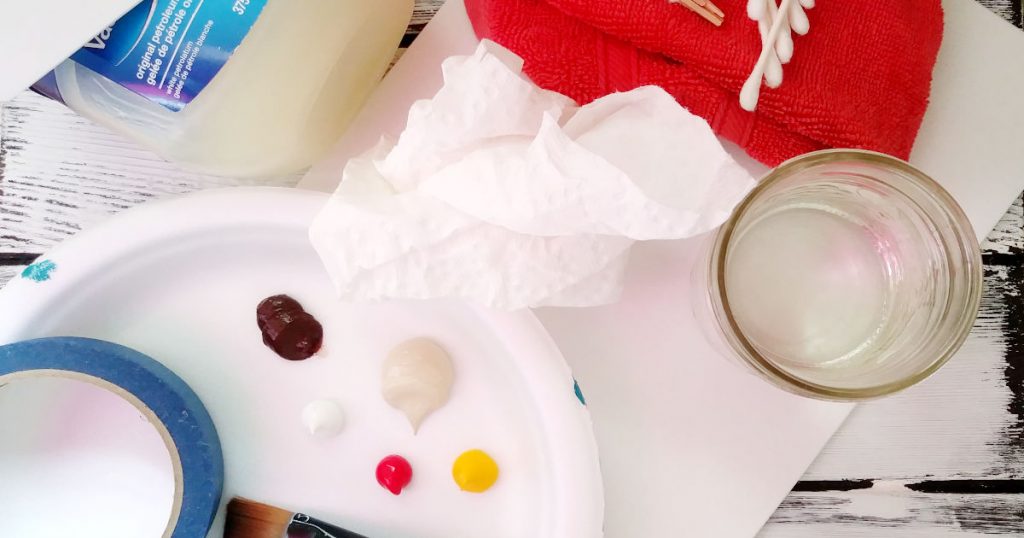
For this project you’ll need:
- Canvas panel (whatever size you like) or even a piece of wood
- Paint:
- Burnt Umber (if you don’t have a brown, go to my article, “What Colors Make Brown Paint” to mix up your own)
- Titanium White
- Unbleached Titanium (don’t sweat it if you don’t have any. Just mix a bit of straw yellow with white and add a speck of dark brown)
- Red
- Yellow
- Black
- Cotton buds
- Ruler or painter’s tape (I will be using painter’s tape)
- Paper towel
- Toothpick
- Palette Knife (or any straight edge)
- Petroleum jelly
- A rag
- Paintbrushes:
- Large flat
- Small angle
- Small round
- Really, any paintbrush you feel comfortable using
- Jar of water
Prep The Canvas
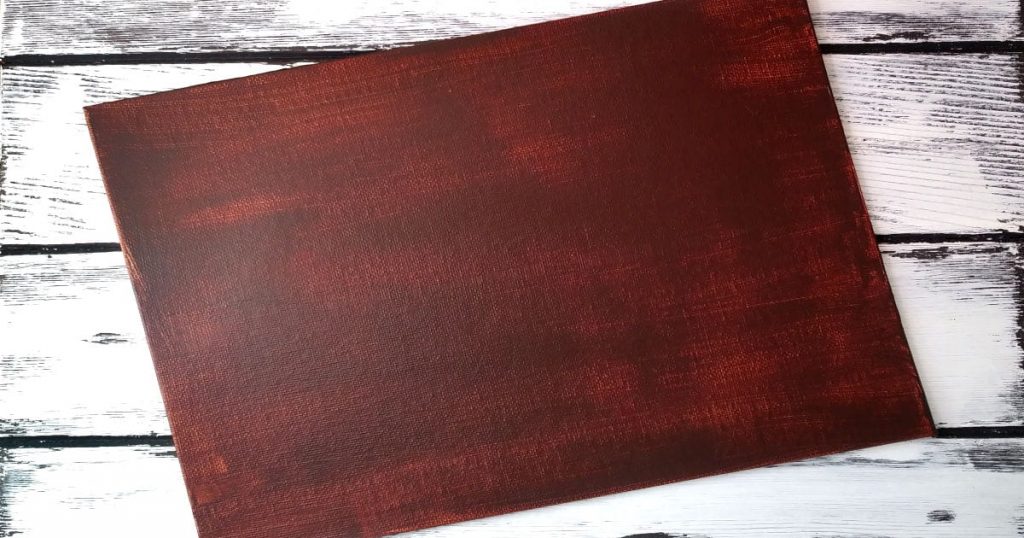
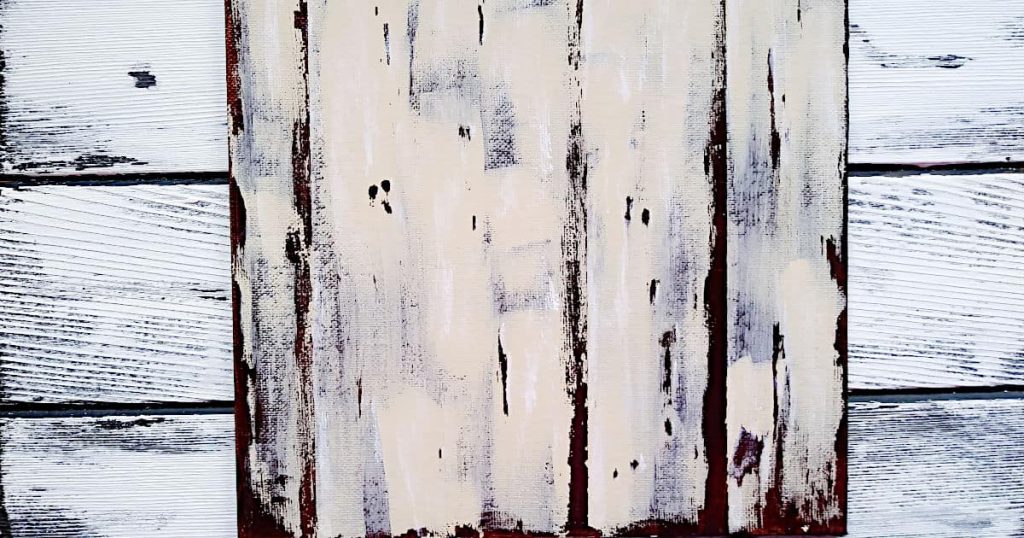
Paint the entire surface of your canvas, or wood, with your dark brown paint and dry completely. You definitely want to make sure that this first layer is dry because we’ll be putting the petroleum jelly on this layer to create our weathered wood effect.
Don’t be too precious about how even the paint is on this first layer. As long as it’s completely covered and you can no longer see any white, you’re good. For mine, I did brush the paint in the direction I want my planks of aged wood to go so I could be consistent with the direction.
Typically, if I start slapping paint around in every direction, I find it hard to reign myself in when it comes time to follow a certain direction with my brush strokes. I’m not saying I get carried away but….. moving along!
Add Spaces Between Your Planks
Once you’re sure that your base layer is completely dry, grab your petroleum jelly, tape/ruler, cotton buds, and all other tools from the list above.
This step is going to be very personal. You can choose to just have a bit of aging to your wood or a lot. You can make your wood effect look like planks or leave it to look like a solid piece of wood. You can add wear and tear around the edges, add scratches, divots, dents, etc. It really is up to you.
For the purpose of this tutorial, I’m going to paint a weathered wood effect that isn’t too busy because if I decide, later on, to add a subject on top, I want it to be the star of the show.
The first thing we need to decide is how wide we want our planks to be. Typically, it looks a bit more interesting if you don’t make your planks too symmetrical.
What I mean by that is, have one plank that’s almost off the edge of the canvas, with two other planks that are wider. The main thing is to not divide the planks straight down the middle. It will distract the viewer from the piece and will take away from the rustic feel we’re going for. Let’s get started!
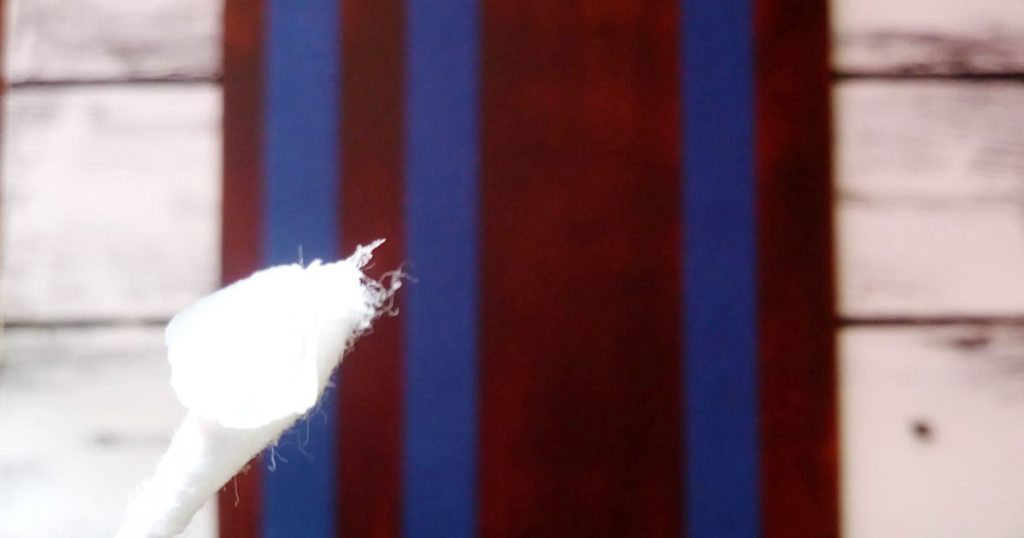
After you’ve decided how many planks to add, and where you want to place them on your weathered wood background, grab your ruler or painter’s tape, a cotton bud, and the petroleum jelly. If you’re using painter’s tape, go ahead and place it where you want your plank spaces to be.
Scoop some of the petroleum jelly onto the cotton bud and use it like a pencil to draw a line up against the painter’s tape or your ruler. The thicker you lay down the petroleum jelly the more defined the space will be after all is said and done.
Don’t worry if your line is a bit wobbly. You can fix it later or leave it as is to give your aged wood even more character.
Continue with the jelly and cotton bud until you’ve “drawn” all of your spacer lines.
Once you’ve got your spacer placed, go ahead and remove the painter’s tape, if you used it.
Make the Edges and Corners Look Worn
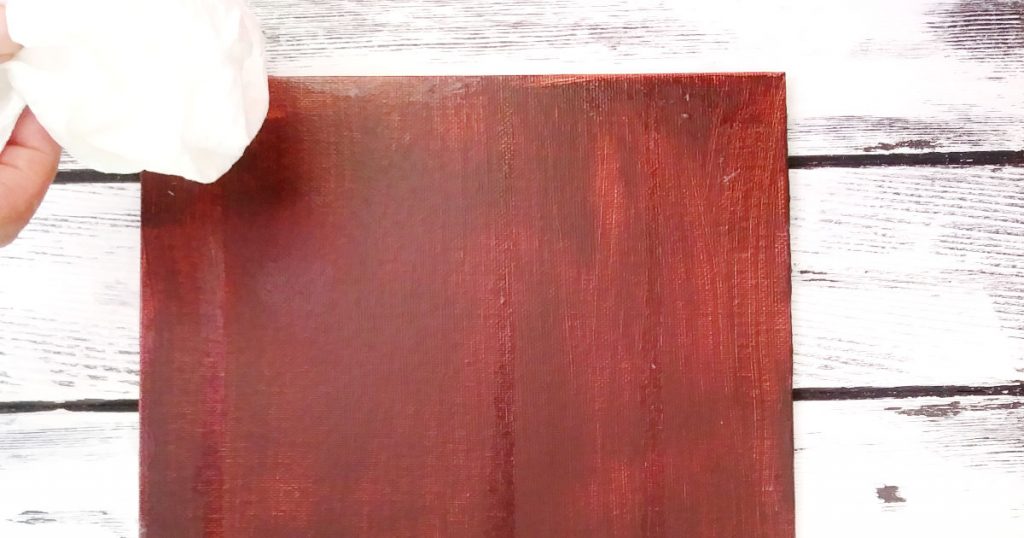
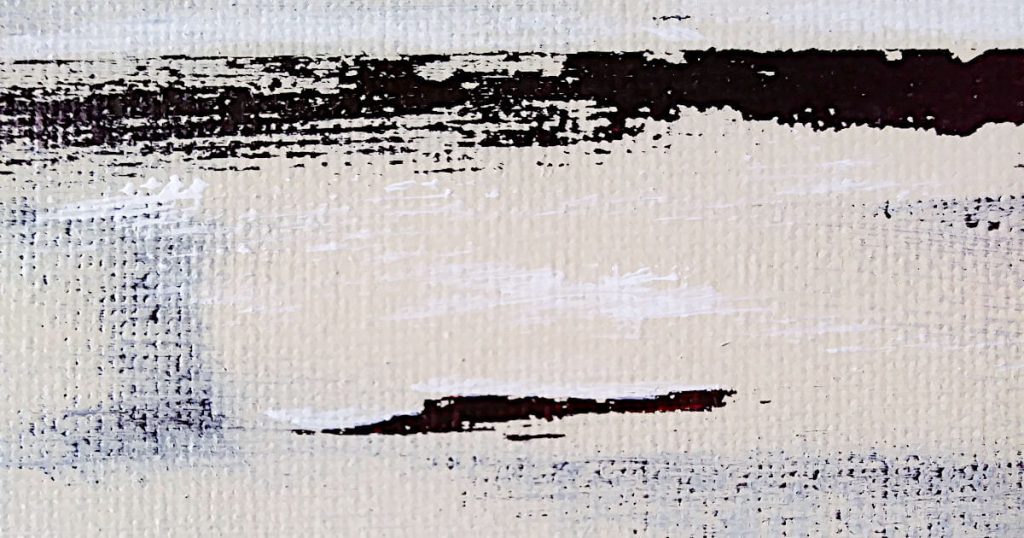
Next, we’re going to work on the edges and corners of our surface. For this part, I like to use a paper towel with the petroleum jelly because you can easily lay the jelly on thick or thin and it looks more random and natural, in my opinion.
When you look at naturally weathered wood, you’ll notice that the edges are usually quite worn when compared to the other areas. You’ll also see that corners tend to get a lot of wear and tear but not quite so much as the edges.
First, we’ll concentrate on the corners by crumpling up our paper towel and spreading some jelly onto it. Feel free to use a brush to get the jelly on the paper towel but make sure to wash it well after you use it.
For this technique, I like to pat the corners of the piece paying more attention to the actual corner and then fanning it out a bit from there. I also like to do a “drag and pat” motion with my paper towel as I’m moving away from the corner.
The mission here is to make it look weathered but you don’t want it to look completely brown once we put the second layer on, except for in the very tip of the corner. Little speckles of the top layer of paint, that we’ll be adding in a bit, are what you’re going for as you move away from the tip of the corner. Basically, if you look at the corner and let your gaze wander toward the center of the piece it should go from very dark to very light in a random pattern.
Now that we’ve got our corner’s done, let’s get those edges looking rustic and banged up! For this part, take a piece of paper towel and cover your index finger with it. Dip your paper towel covered finger into the jelly and rub it along all of the edges. Again, you’ll want to make sure that you’re using a decent amount of jelly so that the next layer of paint can’t reach the canvas surface. If you do end up with some of your lighter color on your edges, don’t worry about it. Weathered wood doesn’t happen uniformly in nature so you’ll always have parts that are more aged and worn than others.
You may notice that you’ve got some petroleum jelly on your fingers and you’ve probably transferred some to places on your canvas that you didn’t mean to (I did too). You can try to scrub the fingerprints off if you want but it will just add to the character of the piece if you leave them.
Add Some Cracks in the Paint
At this point, you could stop and you’d have a lovely, but subtle, weathered wood effect but if you want to make it look really rustic you can start by adding lines that will eventually look like cracks in the paint. Think paint that is so beaten by the weather that it’s starting to peel and lift from the surface.
Using a palette knife or any other straight edge, put some petroleum jelly on the edge, touch the canvas where you want to have a crack, and lift straight up. You can also touch the straight edge to the canvas and then drag it. That will look like a crack that slowly disappears. You can even take your cotton bud and add a bit of a dot of petroleum jelly at the top of some of your lines. It will look like that’s where water has been hitting the wood for a long time, wearing down the paint until the raw wood is showing.
When you’re making these cracks, you could go absolutely nutso with it and add a ton, giving your weathered wood a crackle effect. I prefer just a bit of the peeling paint effect so that it doesn’t take away from whatever I’m going to paint on top of it.
Add a Few Holes

Have you ever noticed, on really old wood that’s been sitting outside for a long time, that it has some small holes in it? They kind of remind me of wormholes in crab apples (termite damage, maybe???).
If you’d like to add some of these to your aged wood background, grab a toothpick and dip it into the jelly. Next, just poke the surface of the canvas where ever you want to place a hole.
Now, be very selective on how many holes you put in your wood, where you put the holes, and how you group the holes. You want to avoid making polka dots all over it or it’ll look like swiss cheese. Not exactly the look we’re going for. Just a few holes, strategically placed is all you need. I like to put most of them in groups of three.
Okay, at this point, you’re probably thinking “How in the world is this going to end up looking like a weathered wood background?!” Trust me, friend. The magic is about to happen!
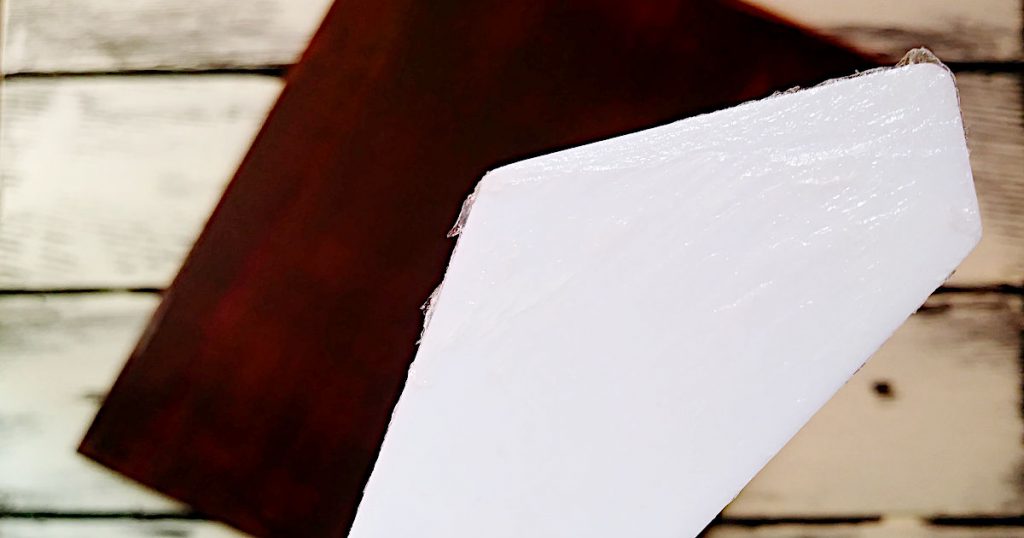
Add the Top Layer of Paint
Using your Unbleached Titanium (cream color) paint, cover the entire surface of the canvas. Yep, you read that right. Right over the petroleum jelly and every stuff!
The trick here is to not go over the same spot too many times, make sure your paintbrush has a bit of extra water in it (you don’t want it sopping wet but you do want it to be more than just damp), and gently glide your paintbrush over the surface in the direction of the grain. If you dig your paintbrush too firmly, you risk moving some of that jelly around.
Make sure that you go with the grain of the wood. So, if your weathered wood planks are going to be running from top to bottom, make sure you’re adding the cream colored paint in the same direction.
Let this layer dry. It doesn’t matter if you have spots that aren’t completely dry because those areas will just end up look like the paint completely flaked away and left you with the base color. You just want to make sure that the majority of the paint is dry.
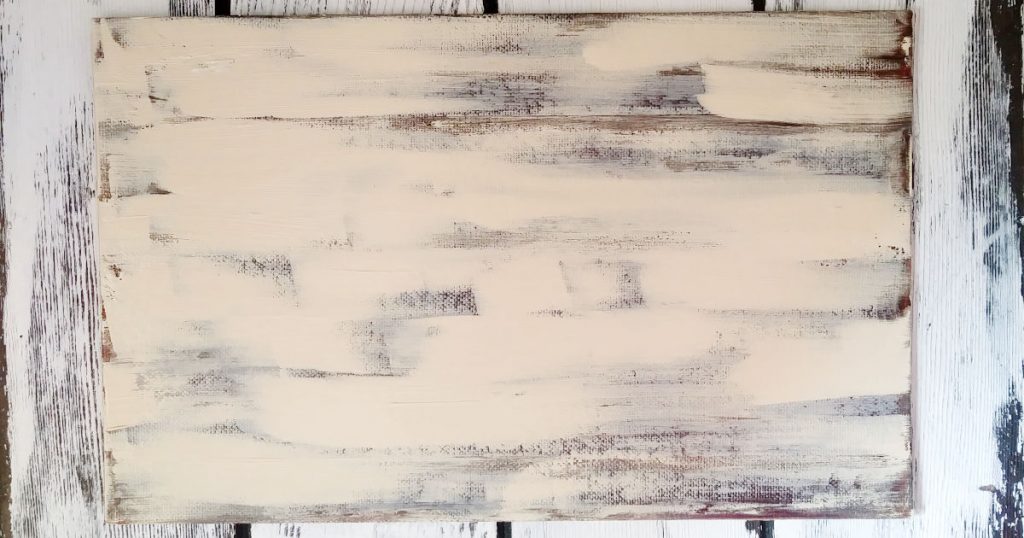
Wipe the Petroleum Jelly off
Using a rag or paper towel, wipe the entire surface of your canvas, in the direction of the wood grain, multiple times. Depending on how long you’ve let your paint dry, you may have to give it a bit of a scrub. I left mine to dry for about an hour while I ate some lunch and did some chores so I had to scrub.
Keep wiping and scrubbing your canvas until you can’t feel any oily bits from the petroleum jelly. Again, this is where you could stop and leave it as is but, if you want to make it a bit more realistic, keep reading!
Add a Few Highlights
Where do you want your light source to be coming from? Top left corner, right corner, off to one side? Knowing where your light source is will be your guide to where your highlights will be.
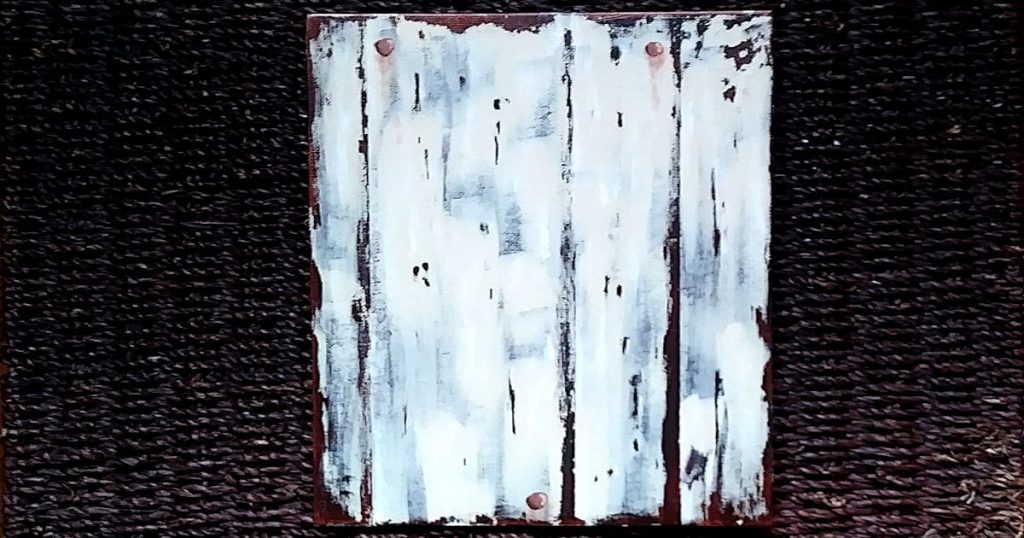
Using some Titanium White and a small brush (this can be any brush that you feel comfortable with but I used a 1/2 “ angle brush), add a highlight along each plank space. This will push the dark spaces back even further and make the bright white spots come forward.
When you make these highlights, use a light hand, and very little paint on your brush. I laid my angle brush flat (so, I did NOT use the edge at all) and kind of rotated between making long, thin scratches and using my finger to soften any hard edges. You don’t want these highlights to be very wide at all but what you’re trying to do is to make the highlights fade into the cream color of the wood.
To make any peeling paint look like it’s really flaking off of your weathered wood background, add a few small highlights to one edge according to which direction your light source is coming from. If you wanted to, you could mix up a bit of your cream color and a bit of your dark brown to make a shadow color and put a few shadows here and there but I’m going to leave mine as is.
I also used a bit of white and the light scratching motion to add a bit of highlight on where I wanted it to look like some of the woodgrain held onto the bright paint in random spots on each plank. I feel like this really helps to create a weathered wood effect that has some depth and texture.
This is a step where you can do as many or as little as you want of your highlights and shadows (if you choose to add them). It depends on if you’re going for realistic or whimsical. The more layers, shadows, and highlights you add, the more realistic it will look.
Paint a Couple of Rusty Nails
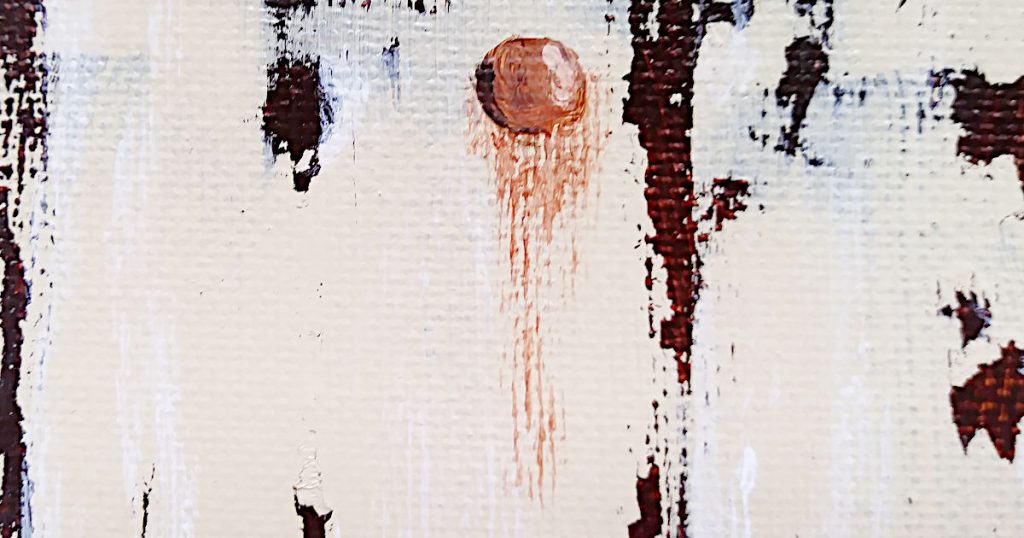
Now, this step is completely optional but I love the look of old rusty nails in a piece of aged and weathered wood.
- Mix your dark brown with a bit of red, a bit of yellow, and a speck of white (you’re looking for a dark brown that leans toward orange to create the look of rust)
- To paint the nail heads, you can use a round brush, the handle end of one of your paint brushes, or even paint daubers if you have them
- Decide where you want to add the rusty nails and, using your dark rusty brown, paint and fill in circles in a size that would compliment what you’ve already got going on. Just don’t make them too small or they’ll end up looking like the little wormholes you added earlier
- When the circles are dry, you’re going to add a bit more yellow and red to your dark rust color and also add a bit of white to make a highlight color
- Again, think of your light source and where the light would be hitting the nail. Place a small highlight there
- Next, mix up a shadow color, using your dark brown and a titch of black
- Thinking of your light source, place your shadow right next to your nail on the cream colored background
- Don’t worry about having each highlight and shadow the exact same on each nail. Maybe one nail is driven further into the wood or maybe it’s bent!
- Let dry
- Lastly, take your paintbrush and dip it into your water jar so that it’s got a bit more water on it than you would typically use
- Using the original rust color, load your brush with just a bit of paint so that you have a watered down version of the original
- To make sure you don’t have too much paint on your brush, go ahead and wipe some off on a paper towel or a clean part of your palette
- Now, with a VERY light hand, and holding your brush near the end of the handle, gently drag your paintbrush from the bottom of each nail, letting the rust color trail down as if the rust has stained the wood after multiple rainstorms (This is a technique I learned from Painting With Jane, which we’ll talk more about in just a bit)
YouTube Recommendations for Rustic Paintings that go with the Weathered Wood Effect
First up, we’ve got a fantastic Rooster Acrylic Painting Tutorial by Angela Anderson. This step-by-step video also has a wooden background that you could use but it’s not overly aged. Either way, this rooster would look great painted on our weathered wood background and displayed in a kitchen.
P.S. – Did you know that it’s considered good luck to have a rooster in your kitchen? True story!
Or, how about a lovely and Easy Daisy Floral Tutorial by The Art Sherpa? Honestly, this painting could go pretty much anywhere in your home. And, the browns, oranges, and yellows used in the daisy would look terrific against our dark brown and cream colored background!
Another Way to Create a Rustic Wood Effect
As I mentioned above, I learned the technique for painting rusty nails from Painting With Jane. In this video, titled “Summer Flowers on the Fence”, Jane teaches you another super simple way to create a weathered wood effect by painting a fence. In addition, you’ll learn how to paint flowers, and in the end, you’ll have a beautiful painting that is rustic and summery. Enjoy!
Final Thoughts on Painting an Aged and Worn Wood Effect
Once you get the hang of this technique, you will have so many options for unique and cozy paintings you can make for your home. Knowing how to paint a weathered wood background is useful for beach, cottage, and farmhouse styles.
As long as you’ve got some paint, some petroleum jelly, and a bunch of different tools to put the jelly onto the canvas, you’re good to go! So, what do you think would be a great idea for a subject to paint on top of a background with a weathered wood effect? Let me know in the comments below.