
Meet the Author

Artist | Owner of Squishing Paint | Educator - Sara brings over 40 years of creative experience, a decade of specializing in acrylic painting, and a passion for guiding new artists as they embark on their own artistic journeys


Today, I’m going to share with you how to paint an easy fall tree that’s perfect for acrylic painting beginners!
We’ll talk about blending a diffused background, how to quickly paint a tree trunk and branches, and then we’ll get to the fun bit, painting the gorgeous fall leaves! Plus, I’m going to let you in on the secret I use to keep my student grade paints vibrant without any struggle.
Overview of Our Simple Autumn Tree Painting
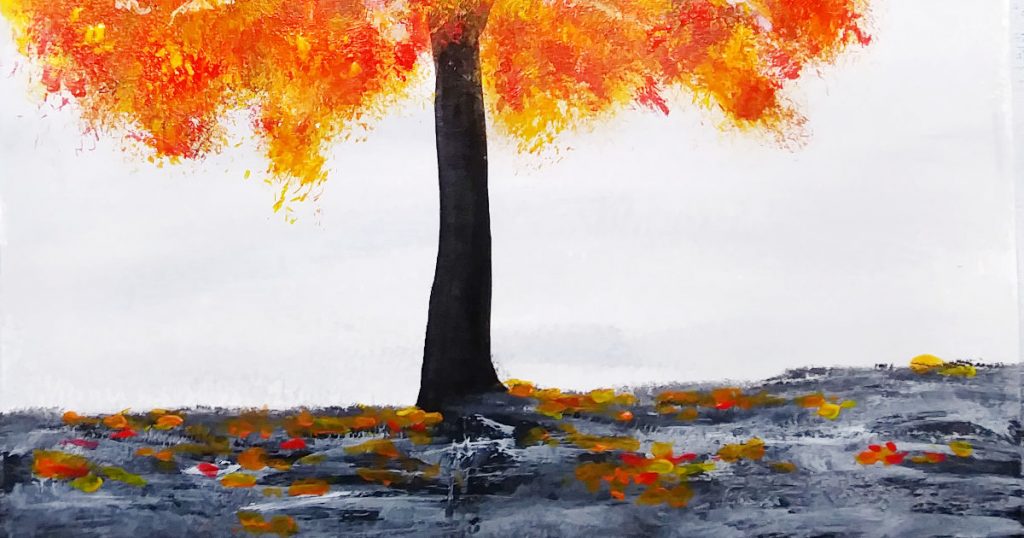
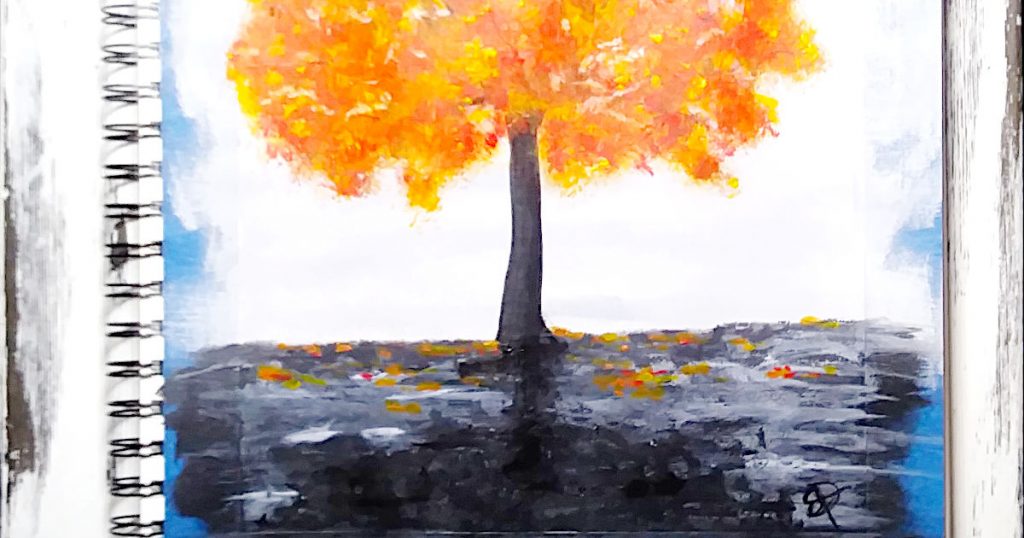
I live in the Canadian Maritimes and, let me tell you, we have spectacular displays of fall leaves! No matter where you visit, whether you’re up in the hills or down by the ocean, you will be blessed with an awe-inspiring vista of vibrant leaves, especially if you visit during October.
My absolute favorite kind of day during the fall is when the sky is dull and moody. Against that neutral sky, the autumn leaves pop!
So, to put the full focus on our easy fall tree, we’re going to start with a pretty dull blended background that is so super simple. We’ll quickly slap some thick paint around and make it look blended but with hints of something happening in the background.
Then, we’ll paint in a quick tree trunk and branches, followed by lots and lots of different colored fall leaves, and finish off by adding in some fallen leaves. Ready to get started learning how to paint an easy fall tree for beginners? Let’s go!
Materials You’ll Need to For this Fun Autumn Landscape
My goal with this tutorial is to make it easy to get down to painting without worrying about all of the gazillion different supplies you’ll need. We’re going to use a limited palette, and you’ll be able to customize your fall tree painting depending on what you have on hand for a painting surface and brush sizes.
I’m also going to give you an alternative tool for painting your fall leaves just to show you that you don’t need specific paintbrushes to paint them.
Supply List for Our Easy Fall Tree Tutorial
I’m going to list exactly what I’m using to paint my fall tree but feel free to use whatever colors, surfaces, and brushes you have on hand.
- 9×12 Mixed Media Paper (or any surface you have)
- Paintbrushes:
- Large flat (for painting in your background)
- Medium sized angle (for the tree trunk)
- A couple of different sized round brushes (for the branches)
- Stiff cheap brush with splayed bristles
- Paint:
- Titanium White
- Mars Black
- Cad Red Medium Hue (or any bright orangey red)
- Cad Yellow Medium Hue (or any warm sunny yellow)
- Kitchen or sea sponge
- Paint Palette
- Jar of clean water
- Rag or paper towel for cleaning your brushes
Painting an Oh So Fun Background
For our background, we’re going to keep it real simple and fun. The sky will only be different mixes of black and white paint, which we’ll just slap on the canvas and blend as we go. This has to be one of my favorite ways to quickly add a background and it’s totally customizable.
You can switch up how your sky looks depending on your paint strokes. That’s all there is to it! If you want a calm overcast sky, just make sure to blend your paint well and move your brushstrokes horizontally across the canvas.
If you’d rather have more drama, consider making a streaky background that is painted vertically. This will give the impression that your main fall tree is in front of a forest of trees. Also, if you make your background lighter in the middle and make it darker as you move toward the edges it will look like your brightly colored tree is in the middle of a forest with a path behind it or wherever your lightest part is on your canvas.
Another way to create drama and the impression of weather happening is to brush your paint diagonally. If you leave it nice and streaky, it will seem as if rain is falling.
Before we get started, though, you can do a blue sky if you’d rather. Blue looks particularly stunning as the backdrop to a tree loaded with orange colored fall leaves. This is because blue and orange are complementary colors. Just make sure that your blue sky is completely dry before adding your orange leaves or you’ll end up with mud (totally not the look we’re going for here). Also, the sky is bluer overhead so start with your deepest shade near the top of your canvas and gradually make it lighter as you make your way down to the horizon line. Use the same technique as I’ll be using below just with your preferred colors.
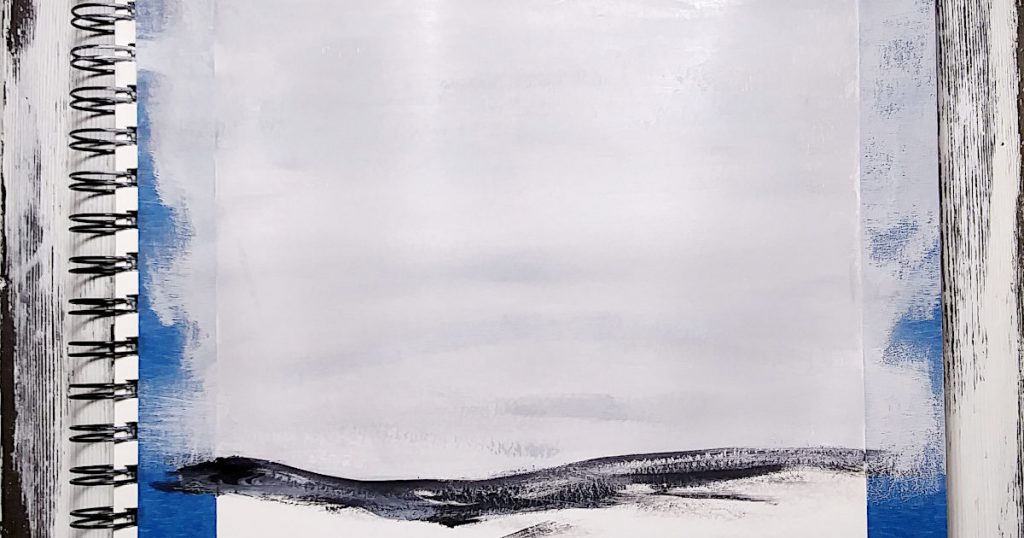
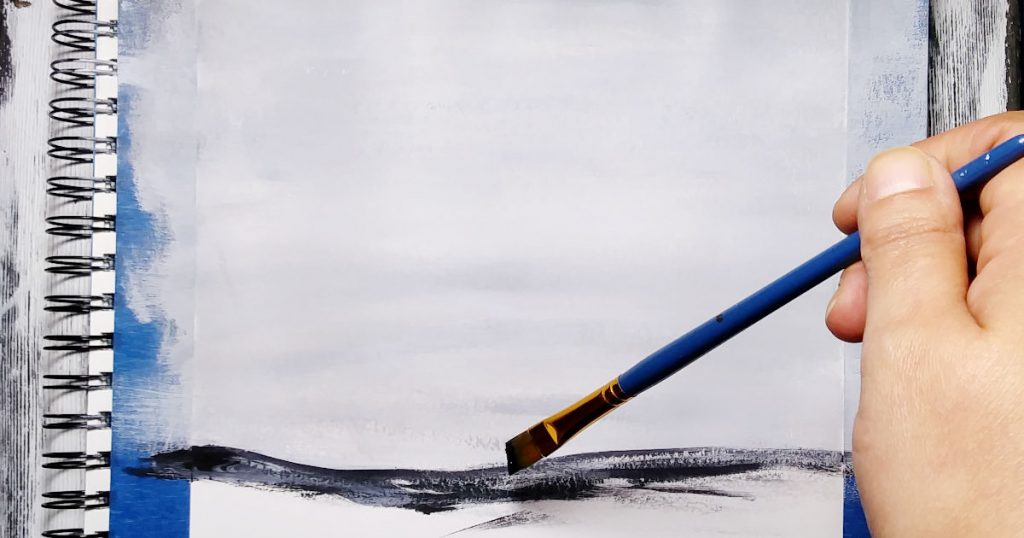
For this easy fall tutorial, we’re just going to blend our sky to make it look overcast using black and white paint.
- First, decide where you want the trunk to start and draw a line (not completely straight!) from one side of your canvas to another. I want the majority of my painting to be focused on the bright colors of the fall leaves so I’m only going to go up by about three fingers width from the bottom
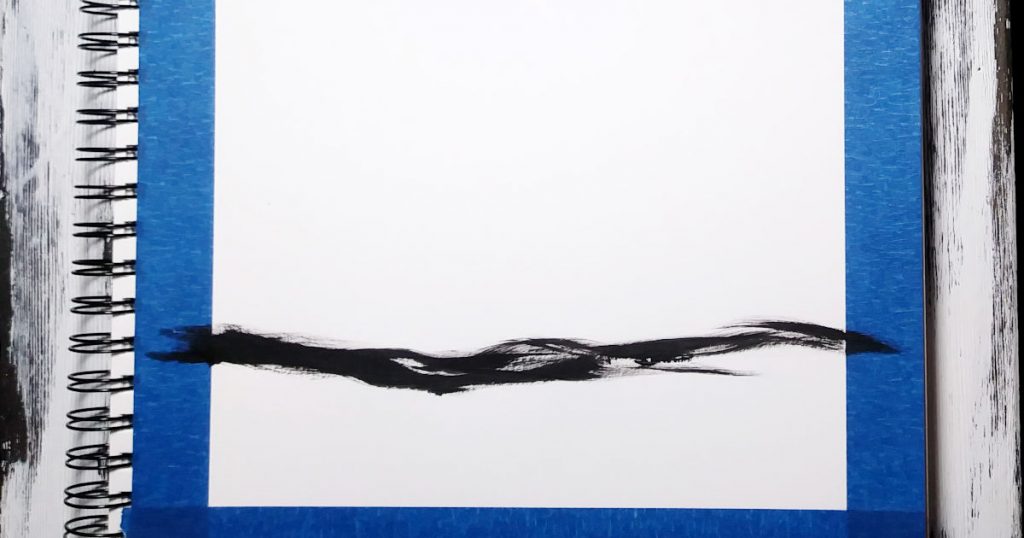
- Now that we know where the ground will be, let’s fill in our sky
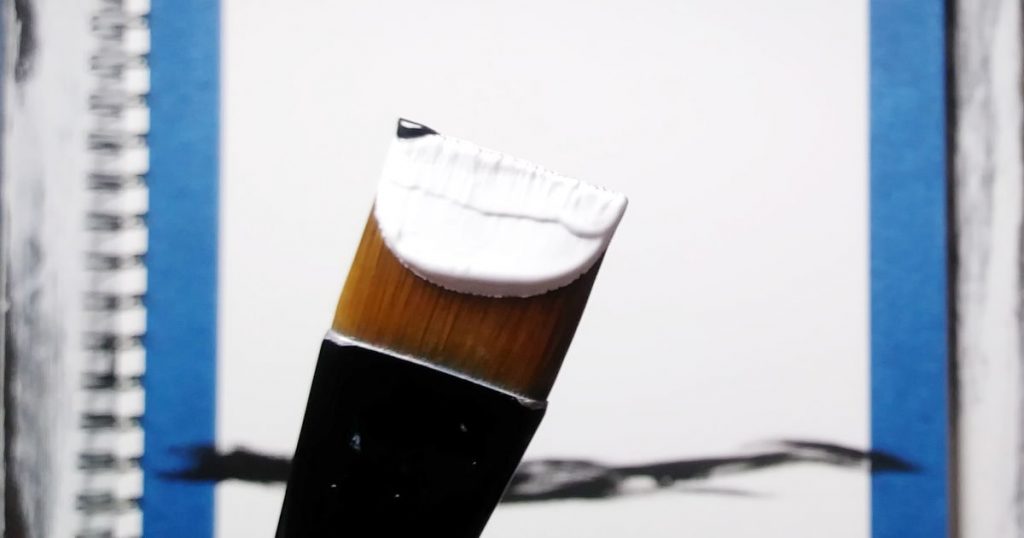
- Load your large flat brush with mostly white paint but then dip just one corner into your black (Just a little bit! Black is a strong color so it can easily overtake the white)
- Starting at the top of your canvas, work the paint back and forth horizontally until your sky is filled in right to your horizon line (we’ll deal with the ground in just a bit)
- If your sky is too dark, just pick up white and blend it into the wet dark paint that’s already on your canvas
- If you find that your sky is too streaky, lighten the pressure on your brush and gently sweep out the sharper edges of your brush strokes
- As long as your paint isn’t starting to dry, you can keep going over this as many times as you like. I wanted to leave a bit of streakiness to my sky for interest
- Don’t fuss with this too much. Let your background be painterly so that your fall tree is the star of the show. Remember, this is a “how to paint an easy fall tree for beginners” tutorial so the background really isn’t a big deal
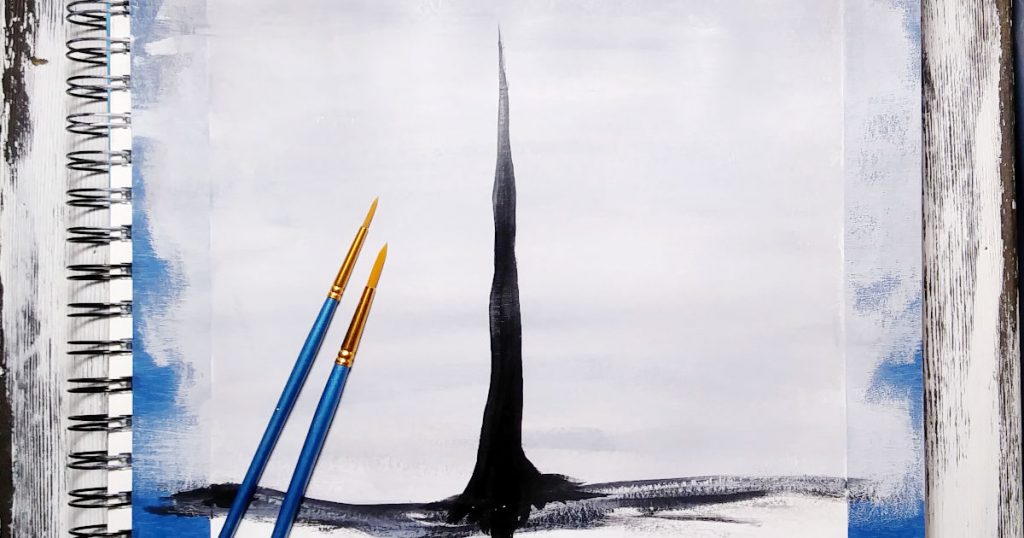
Adding a Tree Trunk
Before we begin, please, don’t get nervous about this part. We’re just going to go for it and whatever happens, happens. If we are going to learn how to paint an easy fall tree for beginners, our tree needs to have a simple trunk. Plus, if your tree trunk looks wonky, or even too straight, you can easily fix it by painting over parts of it with the brightly colored fall leaves. You won’t even know that a boo-boo was made! Take a deep breath and:
- Grab your angle brush and dampen it
- Pull out some black paint and load your brush, making sure to keep the top edge of the bristles nice and sharp
- With the longest bristles of the angle brush closest to you, plant your brush just below your horizon line
- Drag your angle upward on the canvas, lightening your pressure as you go
- Keep lightening your pressure until you have lift-off
- You can repeat this process as many times as you like until the bottom of the tree trunk is as thick as you’d like
- If you find that your paint is skipping across the canvas, add more water to your brush (you don’t want your paint to be runny but you want it to glide across the canvas)
- If the top of the tree trunk fell right off the top of the canvas, let it dry and then redo the sky down to the point where you’d like your treetop to be (remember, we’ll be adding lots of fall leaves so you want to make sure you have some space at the top of your tree trunk to add some leaves
Painting a Few Quick Tree Branches
Let’s move on to painting in our branches. Again, don’t get too particular about this because we’ll be covering the majority of the tree branches with our easy fall foliage.
Painting tree branches really isn’t that much different than painting the tree trunk. You’re going to plant, drag, and lift.
I know a lot of new artists struggle with tree branches so be kind to yourself and just let your brush do all of the work. Don’t worry if your brush skips a bit so that you have gaps in your branches. Don’t stress if your branch gets away from you and is thicker than you think it should be. It’s all going to be strategically covered up!
- Taking the larger of your two round brushes, dunk it in your clean water jar and shake it back and forth against the rim of your jar to knock off any stray water droplets
- Pull some of your black paint out of the pile and load up your round brush
- Twist the handle of the brush between your fingers as you’re pulling it away from your black paint pile so that it keeps a nice sharp point
- Decide where you want your lowest branch to be and plant your brush just down from that on the trunk
- Slowly drag your paintbrush, while lightening your pressure, away from the trunk
- Continue lightening your pressure until you completely lift the round brush off of the canvas
- Move up the trunk and add another branch
- Keep repeating this process until you’re almost to the top of your tree (about a fingertip’s width down from the top
- You can add even more slightly thinner branches to the existing branches if you want
- If you make some of your foundation branches more up and down, where they may twist and turn over some of the branches you’ve already painted, it will look like those branches are more toward the front or back of the tree. The other branches will look like they’re coming out of the trunk on its sides
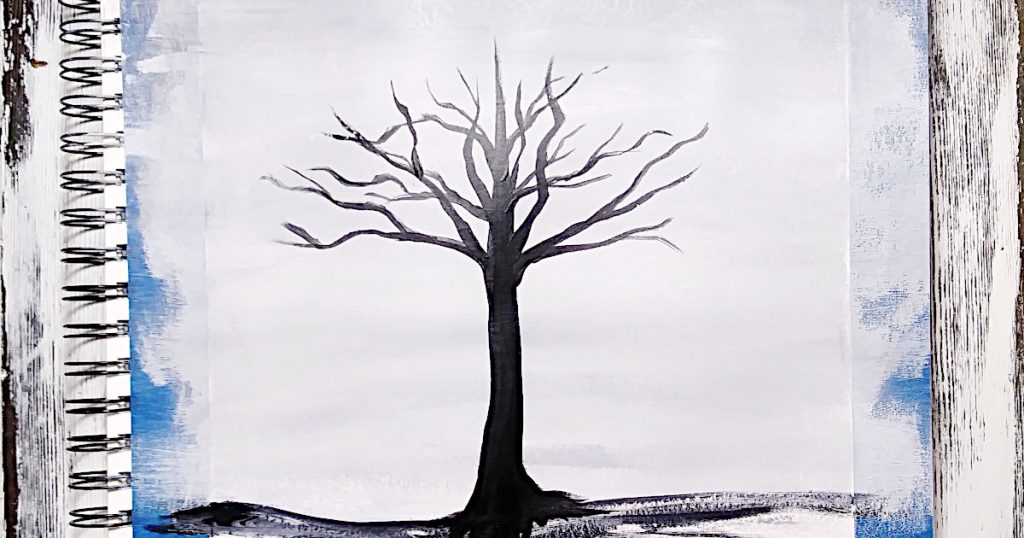
- Switch to your smaller round brush and, using the same process, add some thinner branches to your main branches that you just painted
- When you get to the bare spot at the top of your tree, add in a few skinny branches that point more toward the sky but not straight up. You just want the tips of your tree limbs to end in an upward direction
- I added a ton of branches because I find it very relaxing so I tend to get carried away with them. You do NOT have to go as crazy as I did with them, since they’re mostly going to be covered up, but if it makes you happy, go for it!
- Let dry completely
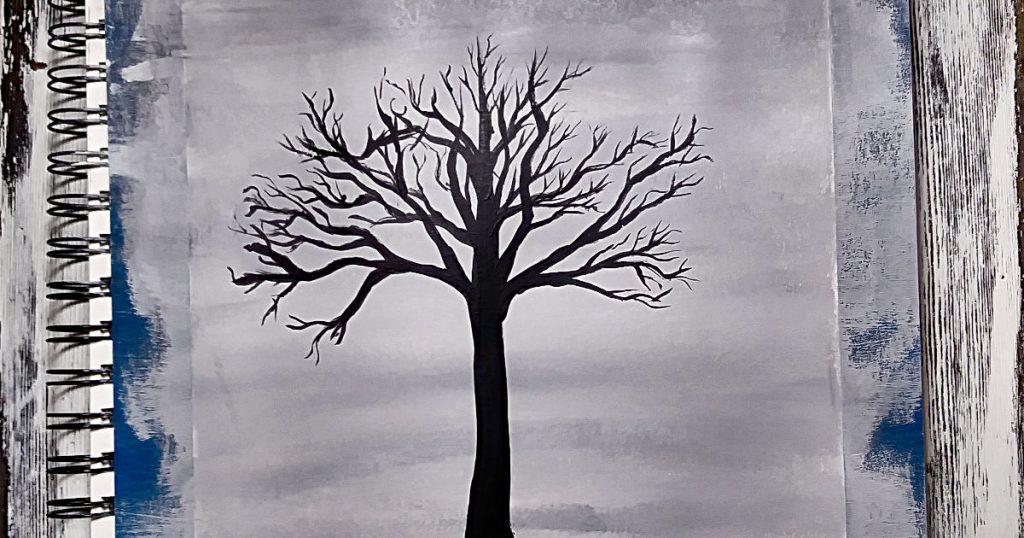
Quick and Easy Technique for Painting an Interesting Ground
While we wait for all of our branches to be completely dry, let’s work on our ground.
If you wanted to, you could just paint this entire area black and call it good. But, I have a technique that I use quite frequently that I think you’ll enjoy. It’s a simple way to create depth without trying to paint every blade of grass “just so”.
Again, this is an impressionistic technique so it’s just supposed to give the illusion that something is going on without being specific. In other words, you leave the viewer wondering “Is that grass? Is it rocks?” It’s just enough to make things interesting without being distracting.
- Go ahead and paint your ground area all black and let dry
- Next, grab your large flat brush, get it damp, and load it with a small amount of white paint (you don’t want gobs!)
- Holding your brush parallel to your canvas, very lightly drag it across the canvas horizontally
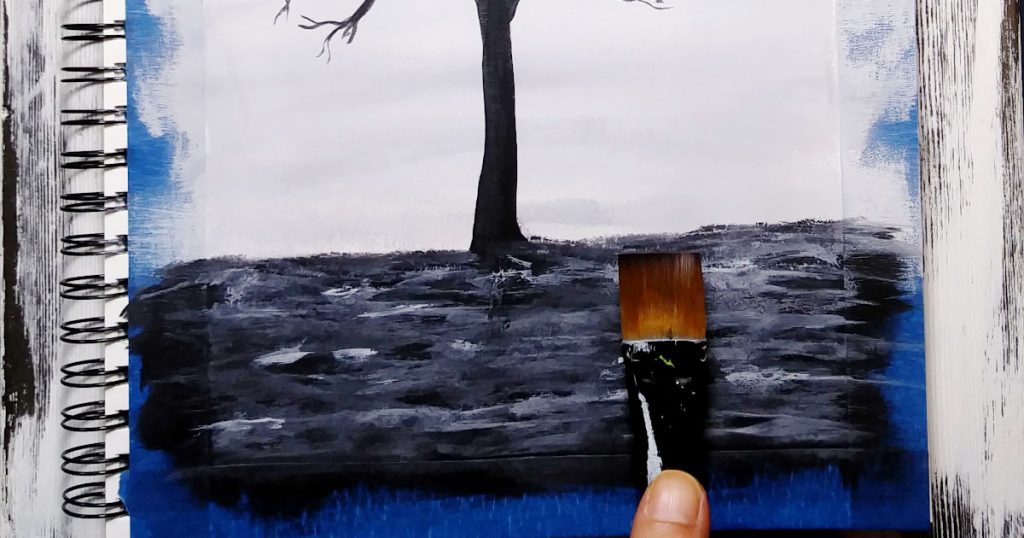
- Be sure to keep your pressure very light! You want your brush to skip across the canvas so that you don’t cover all of the black
- To create even more depth, you could use varying shades of grey, using the same technique, and finishing with the white in just a few places
We’ll add some strategic shadows later on but let’s move on to the fun part of our “how to paint an easy fall tree for beginners” tutorial, the fall leaves!
Adding in the Colorful Fall Leaves
Now comes the best part, woohoo! I know I keep saying this but, this is so simple, guys, and here is where I’m going to let you in on how I keep my colors nice and vibrant.
I’ll show you something else you can use to make fall leaves in just a bit but, first, we are going to start with our fuzzed out brush.
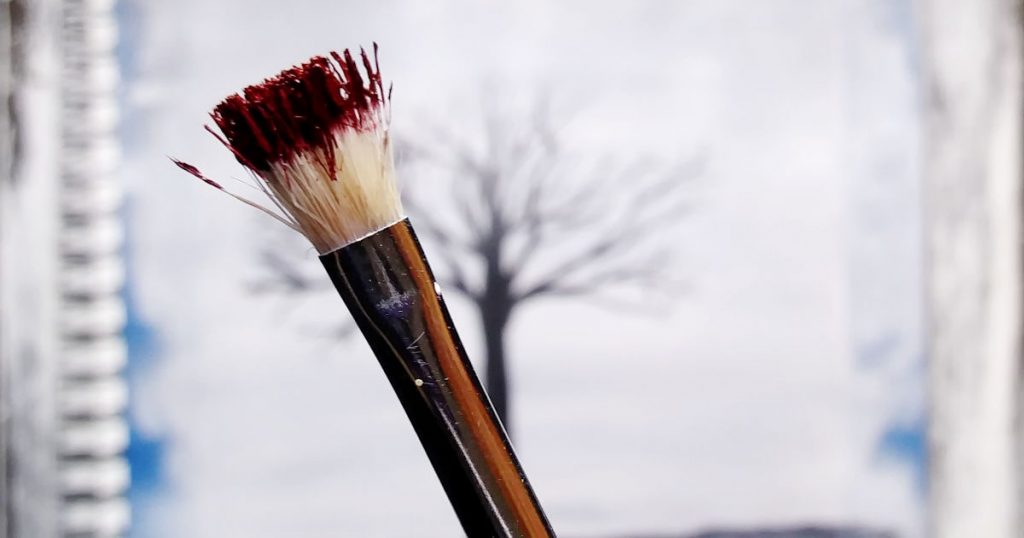
You can buy these brushes pretty much anywhere. They typically have wooden handles, with really firm cream colored bristles. Like, when I say firm, we’re talkin’ “scratchy-no-give-wouldn’t want to use this brush to put makeup on” firm!
Let’s add the shadow color for the fall leaves
- Take your scruffy brush, pick up the tiniest amount of black, and offload it on a clean part of your palette
- Next, do the same thing with the red, mixing it in with your black
- Keep adding red (or black) until you’ve got sort of a dark reddish brown color
- Now, make sure that your scruffy brush doesn’t have very much paint on it at all. You want it to have the dark color deposited on the bristles but you don’t want it to look wet (this is a dry brush technique)
- Holding your brush straight up and down, gently dab it on or near one of your branches
- If you deposit too much paint with your first dab, wipe some of the paint off of your brush
- Continue to dab your brush, reloading only when it’s not depositing paint anymore until you’ve got it placed where you think your leaves will go
- When you dab, make sure to be random. Don’t concentrate on one area before moving on to the next. Bounce your brush from one side of the tree to the other, near the top, in the middle, out far on one branch. Just imagine those dabs as all of the random thoughts bouncing around your head….I mean, it’s not just me, right? Hello? Anyone?
- Make sure to leave lots of spaces where your background shows through your leaf shadow color
- Try not to focus on putting the shadow color just next to your branches because that will just make your branches look like they have a fuzzy outline. You want your leaf shadow color to overlap your branches, and even your trunk, in some places
- Dab a few times beyond the tips of your branches so that your tree looks more natural
- Once you’re happy, scrub your scruffy brush on a piece of paper towel or a rag to remove the leftover paint. You don’t want this brush to touch water until you’re completely done with the leaves. Any dampness will cause the small amount of paint to dilute too much and it just won’t work the way we want it to
And, now to add the secret ingredient!
- Once your shadow color is dry, take your scruffy brush, add a tiny bit of white paint to it, and off-load the majority of it onto a clean part of your palette
- Use the same method as above to add dabs of white paint over your shadow color but don’t completely cover all of that dark red color! We want some of that to shine through in the finished painting
Here’s the deal, using white paint before adding in your bright reds, yellows, and/or oranges will help keep those colors vibrant and lively. You see, most reds, yellows, and oranges have at least some transparency so whatever color is beneath them will affect the final outcome. If we add white first, we can more easily make those bright colors really stand out!
Also, it’s worth mentioning that you want the white dabs to vary in intensity so that it looks more natural once the colors are added on top. To do this, you’ll want to carefully add a bit more white to your scruffy brush every once in a while. Your goal is to have some bright dots of white, some that are faint, and some that are in between the two. All of that variation is going to help your fall tree look lush and full.
Adding the vibrant colors
To me, this is the most exciting part of our “how to paint an easy fall tree for beginners” tutorial. There is nothing quite like a bold pop of color against a black and white background so let’s get right into it!

- Using the same scruffy brush, pick up some of your red paint. You want to have a bit more on your brush than in the previous steps but not so much that, when you dab, you’re left with a polka dot!
- You’re going to alternate between red and yellow, covering the white dabs with bright fall leaves
- You can use more red than yellow, vice versa, or mix your red and yellow to make orange
- Make sure to leave some of your background showing through and don’t cover up all of your dark shadow color either
- Be really light and free with your placement and just see what happens
- If you’ve accidentally covered up most of your background, just take your round brush, mix a bit of white and black (to make grey), and dab your brush here and there. Once it’s dry, you can blend in the edge by adding more leaf colored dabs
- The same goes for your shadow color. Just add the dark reddish-brown back in and then put a brighter spot here and there to push the edges of the shadow back
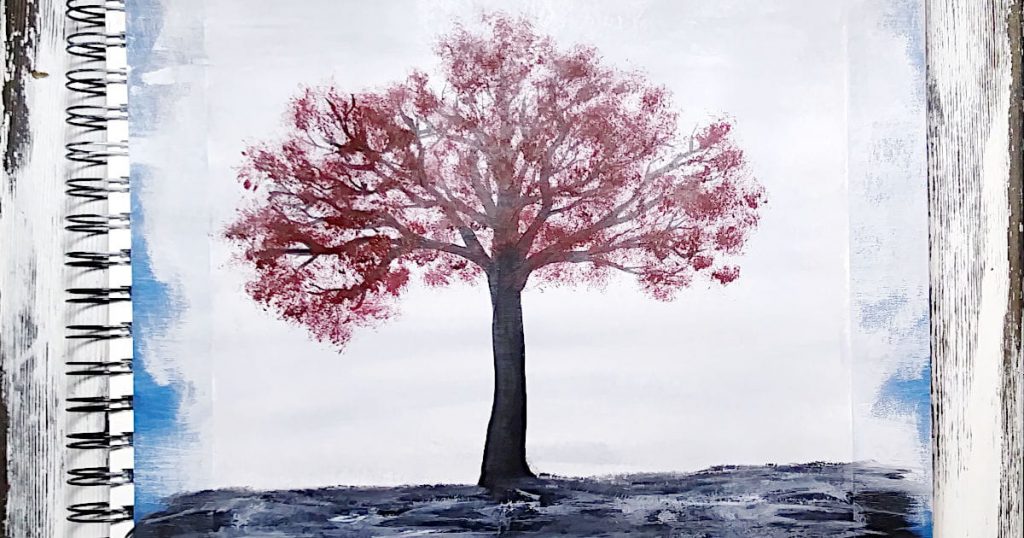
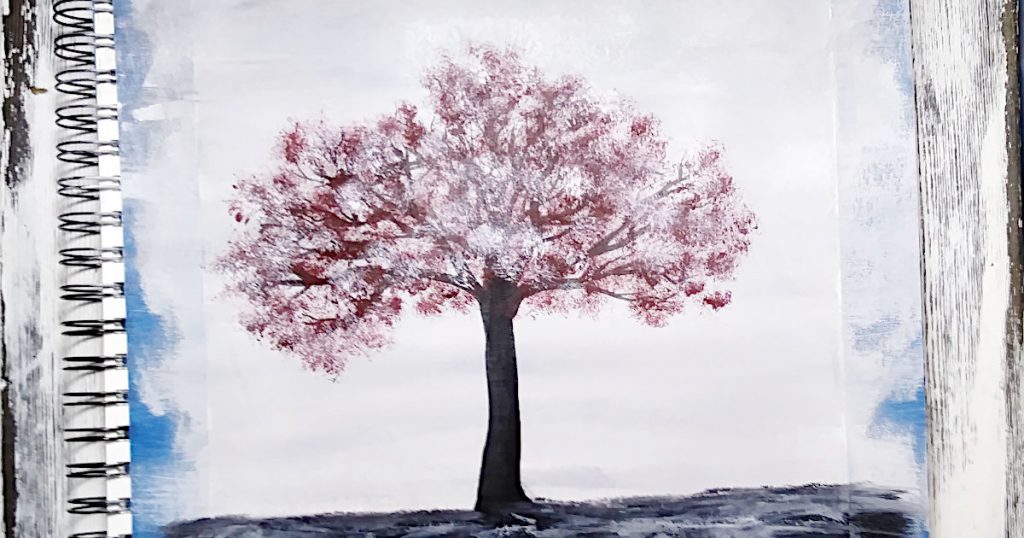
You could stop right here and have a beauty of an easy fall tree or you could go back in with your white dabs wherever you think more light would hit. Once that dries, add in a bit of your yellow to create highlights.
I actually went through the whole process a few times to build up depth and add in more background because, again, I was having too much fun and went nutso with the dabbing of the bright pretty colors. I also switched to a larger scruffy brush because I wanted my leaves to have a bit of texture and just be a bit more abstract.
Alternative Tool for Painting Fall Foliage
If you don’t have any scruffy brushes, I’ve got an…. unusual idea for how you can paint fall leaves on your tree. Now, it’s not going to look exactly like mine but, even if you were using a scruffy brush, it shouldn’t! Art is supposed to be a unique expression of how you see the world, not how I or someone else sees it. Ready?
- Make sure to mix up your dark red color first before you get going
- Using a small piece of a kitchen sponge or sea sponge, add your colors in the same order as above but, this time, you’ll be using a bit more paint and you’ll be gently pouncing the sponge onto the surface
- Keep in mind to use a clean spot on the sponge whenever you change colors so they don’t get all muddy
- The more holes your sponge has, the more definition you’ll get in your leaves
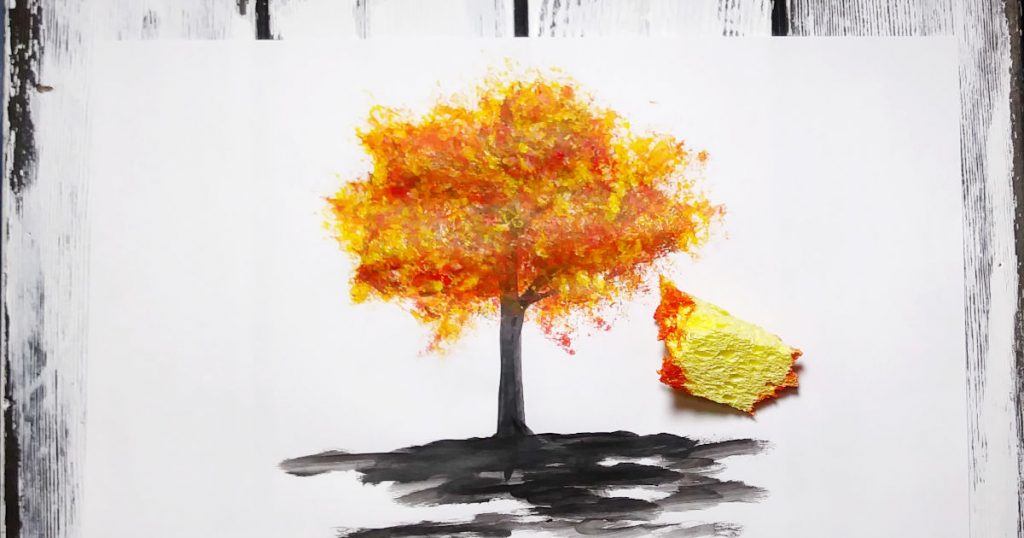
For my example above, I used a small piece of a kitchen sponge. Not too shabby, eh?!
Impressionistic Fallen Leaves
Our easy fall tree painting for beginners is almost complete but it’s just not going to look even a little bit realistic without adding in some fallen leaves. To add these, we’re going to use our smallest round brush to lay a small amount of bright color on the ground.
- Take your smallest round brush, dampen it, and load the tip of it with your red, yellow, or orange paint
- Plant the tip of the brush on the ground, underneath the tree, and lift up as you slightly pull away, horizontally, from where you first planted it. You’re trying to make a skinny oval or teardrop shape that lies horizontally
- Place different colors of this shape sporadically under the tree, with a few coming down, and getting a bit larger, toward the bottom of the canvas
Feel free to add as many fallen leaves as you want. If you make your shapes big, they will look more like a pile of leaves. As you can see, I just puddled my leaves closer to the tree because that’s where I want the focus to be.
Last Little Touch Up on Our Simple Autumn Tree Painting
To finish things off, let’s add just a few small branches back into our fall tree painting. I think we’ll also add a bit of shadow to the ground where the tree trunk interrupts the flow of light.
- Take your smallest round brush and make sure it’s nice and damp
- Put a small amount of black paint on the tip and roll the brush to make sure the tip is nice and sharp
- In amongst your beautiful fall foliage, add a very small thin branch, here and there (not too many!)
- You only need a few to create dimension to the foliage
- Once you’re happy with that, take a good look at your painting and decide where the lightest part of the sky is and how that light spot would hit the tree
- In my fall tree painting, the light is directly behind my tree so that means the shadow from the trunk will be directly in front of it
- Taking your round brush (smaller is better), load it up with a bit of a dark grey
- Hold it horizontal to your canvas and let it skip across the surface to make a very rough copy of your tree but NOT an exact copy! Remember, it’s an overcast day so there won’t be a very noticeable shadow
- Notice in my painting that the grey shadow extends out on either side a bit and then a black shadow comes down the canvas from the base of the trunk, getting a bit lighter and widening near the bottom of the canvas to represent the canopy of the tree
YouTube Recommendation
As I like to do, I thought I’d include a great YouTube tutorial by Painting with Jane. In this video, “Crimson Forest“, Jane shows us how to paint a beautiful red tree in a black and white forest using a palette knife. It would complement our easy fall tree tutorial nicely. I can imagine these two autumn tree paintings paired together on a small wall.
Wrapping Up Our Beginner Friendly Vibrant Fall Tree Painting Tutorial
I wanted to paint an easy fall tree for beginners because I know how many new artists struggle with trees. This fun little fall painting shows you how to get a beautiful result without the stress of perfection. Plus, what better way to celebrate the beauty of autumn trees dress in their finest!