
Meet the Author

Artist | Owner of Squishing Paint | Educator - Sara brings over 40 years of creative experience, a decade of specializing in acrylic painting, and a passion for guiding new artists as they embark on their own artistic journeys


Updated November 2023
Simple Tricks for Painting Christmas Trees on Canvas
If you’re struggling to find your holiday spirit, try your hand at an easy Christmas tree painting! In this article I’m going to share with you how to add pizzaz to your painting, things to be aware of for ultimate success, my favorite YouTube painting tutorials, and a very cool idea that will make your tree painting the centerpiece for all of your holly jolly merry-making shenanigans!
So, grab your favorite seasonal drink, put on some holiday tunes, and let’s get started!
What To Do If You Can’t Paint A Christmas Tree
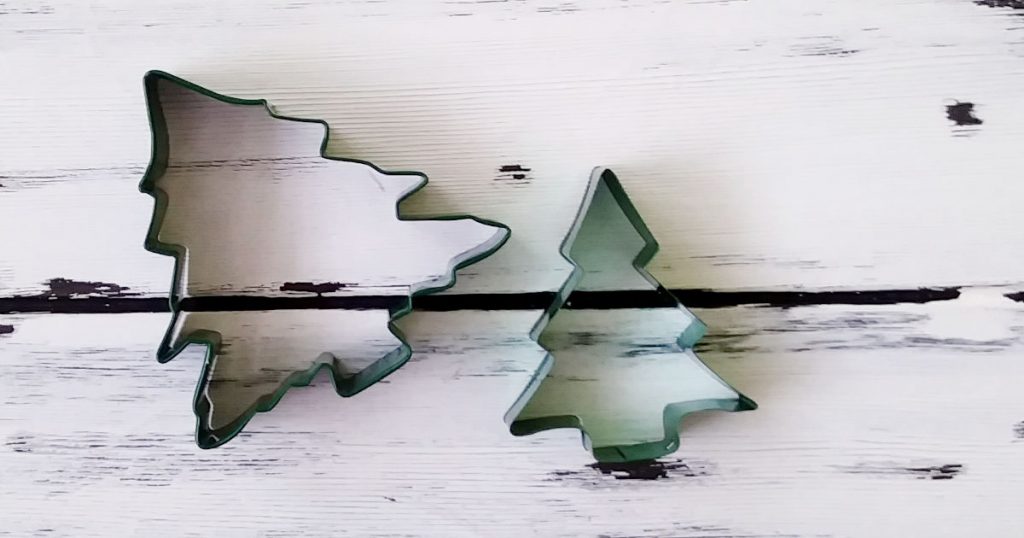
If this is your first time painting, or you’ve tried an easy Christmas tree painting in the past that looked more like a Christmas blob with tentacles, I’ve got a great little hack for you!
If you have a Christmas tree cookie cutter, use that as your template. Simply place it on the canvas, hold it down firmly and paint it in with green paint. Voila!
If a cookie cutter is too small for the size of your canvas, no worries! Just use the steps above, then continue to follow the outline of your tree as you paint around the outside. Keep adding to the outside of your Christmas tree shape until it’s the size you’re going for.
Two Things That Can Quickly Get Out Of Hand
There are a couple of things that can make your easy Christmas tree painting not so…..well, easy. Both of these issues really aren’t a big deal in the scheme of things but they could cause you frustration. You may start to think that you’ve ruined your holiday painting but both problems are easy to fix.
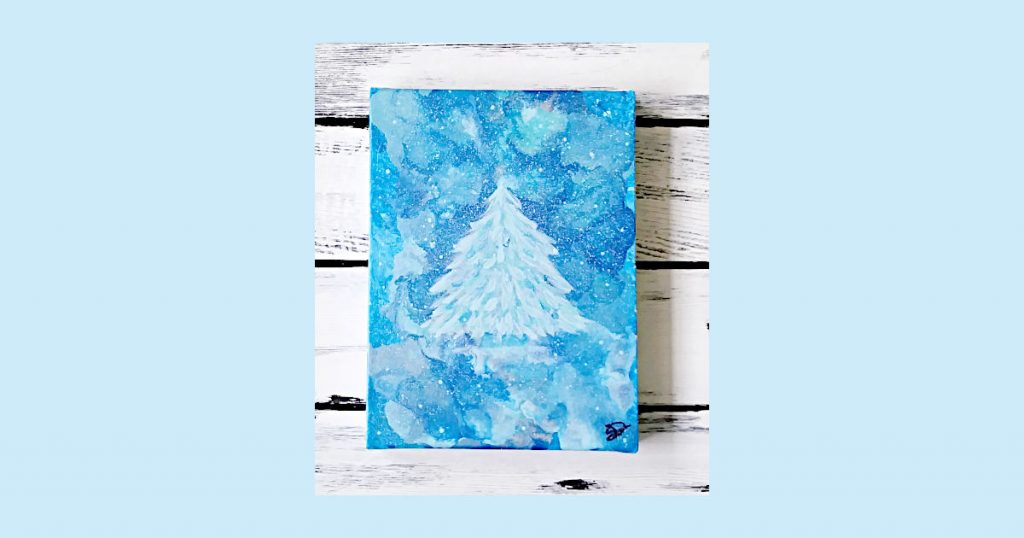
A Snowy Christmas Tree
Painting snow on the branches of your Christmas tree can make any lights or ornaments you add really pop! However, be mindful of how much snow you add. It’s really easy to go overboard with the snow and cover the green branches entirely. You want to make sure that you leave some of the green poking through.
If you do happen to go a bit nutso with the snow, don’t panic. Acrylic painting is all about layers so just wait for the snow to dry, paint some more green back in, let that dry, and, if needed, add a tiny bit more snow to push the green of the branches back so it looks like it’s under the snow.
Painting Ornaments
If you’ve decided to make your easy Christmas tree painting unique by adding some ornaments, be careful of how you place the ornaments.
This is a problem I often deal with. I really get into adding the ornaments and, before I know it, my Christmas tree looks like it has chickenpox. Not cute.
To combat this issue, make sure to paint different sizes and shapes, and frequently take a step back from your painting and look at it from a distance. It’s really no different than when you’re decorating an actual Christmas tree.
You want to try to avoid clumping them but, on the other hand, you don’t want them to be too evenly spaced either.
This could take you a bit of time to get just right but, remember, it’s just paint. If you had way too much fun painting ornaments, you can easily remove some of them by painting the over them.
If you really want to practice painting snow and adding ornaments to your easy Christmas tree painting, give my painted holiday card tutorial a try. I go into way more detail about snow and how to give your ornaments detail.
Add Twinkle, Sparkle, and Glow to Your Festive Tree Painting
The problem with a no fuss easy Christmas tree painting is that it can lack that “thing” that strikes us with child-like wonder. You know, the glitz, the glamour, the ooo, and the aahhhh! Without adding any special effects, you’ll still have an adorable holiday painting. However, these three tips really ramp up the wow factor!
Add Some Sparkly Garland
My first tip is to add a really easy garland to your Christmas tree. This is probably something you’re going to want to do before adding any ornaments or lights.
To add a sparkly garland to your Christmas tree:
- Decide what color you want your garland to be (this would be a great time to use metallic paint if you have any!)
- Load a brush with your chosen paint color and, starting near the top of your tree, start painting a loose zigzag line, that has a slight loopy curve, from one branch to another on the opposite side of the tree but down a bit further (you want your garland to hang at an angle)
- Next, grab some craft glitter (you can get this at your local dollar store) and shake it on top of the wet paint
- Knock off the access glitter and let dry
Don’t try to paint your garland perfectly even. Let your brush paint some parts thicker or skip a bit over the canvas. Wherever your brush skips, maybe there’s a branch that’s in the way, or if your garland is a bit thin in a few spots, maybe that part of the garland is further back toward the tree trunk.
Just leave it and come back to it later. If you really don’t like how it looks, just add a bit more paint and glitter in those spots.
How About Some Glowing Lights?
It’s a piece of cake to add a glow to the lights on your Christmas tree! First, though, add your lights after your garland (if you decide to put it on your tree) but before your ornaments.
To add glow to your Christmas tree lights:
- Load a small brush with a tiny amount of paint in the same color as the light
- Swipe your brush on a piece of paper towel a couple of times to remove most of the paint
- Barely touching your brush to the canvas, start painting in a circular motion around the outside edge of your light
- Continue circling around the Christmas tree light until no more paint is deposited
- If it still isn’t glowy enough, repeat the process
- If you add too much paint, let it dry, paint the background back in, let that dry, and start again

You Can Even Add Real Christmas Tree Lights!
If you really want to add something different to your Christmas tree painting, you can add a string of lights. Yes, really! I mean, you do need to be careful, and it does take a few more supplies, but it can absolutely be done.
The extra supplies you’ll need:
- Small string of LED battery powered lights
- A small sharp instrument (like a craft knife)
- Gel medium or mod podge
- Duct tape
Take a look at this YouTube tutorial by Painting with Jane where she’ll show you step-by-step how to add the lights to your super easy Christmas tree painting.
Make a Statement With This Tree Painting Idea
There are so many ways you could incorporate your festive tree painting into your décor. One idea would be to paint one for each person’s bedroom door using their favorite colors and adding their name. So cute!
Since you can find canvases in a variety of sizes, this gives you literally a gazillion fun ways to display your easy Christmas tree painting. And, if you live in a small space, I’ve got a brilliant idea for you!
Instead of an actual Christmas tree, why not buy a really large canvas and paint one! You can lean it against a wall or hang it to save space. Add some real lights, snow, glitter, whatever you want!
And the best part, you can totally paint over it and start fresh every year or you could spray varnish it and use it for years to come! My only suggestion would be to do at least one practice painting on a smaller canvas first to get comfortable with the techniques you’ll need to use to get the look you want.
More Help With Painting a Christmas Tree
- Mix Up Your Own Green Paint
- Add Snow to Your Christmas Tree
- Alternative Brushes to Use for Branches if You Don’t Have a Fan Brush
Easy Christmas Tree Painting YouTube Tutorials
“How to Paint a Christmas Tree on Canvas with Acrylics” by Createful Art With Ashley Krieger
This is a great little tutorial that is really flexible in the colors you choose to use, what you put on your tree, and if you want to add presents under your tree.
I specifically chose this one for you because she does an excellent job showing you how to add garland/ribbon to your Christmas tree.
“How to Paint a Christmas Tree! – DIY Christmas Gift” by Emily Mackey Art
Emily Mackey is such a joy to watch! She’s funny and talented which makes her tutorials a super fun time.
In this step-by-step tutorial, Emily shows you how to paint a snow covered Christmas tree with glowing lights.
I find her directions on how to add dimension to your tree really helpful and she, also, teaches you her method for adding glow to Christmas tree lights.
“Simple Christmas Tree” by The Art Sherpa
The reason I chose this easy Christmas tree painting tutorial is because Cinnamon shows you a unique way to get that tree onto canvas.
Typically, you’ll see how to paint a Christmas tree from the top down but The Art Sherpa will show you how to start at the bottom and work your way up.
By the time you’ve finished this tutorial, you’ll have learned about adding highlights and shadows to both the tree and snow, how to easily paint a star that has dimension, and how to paint shiny ornaments. It’s a wonderful piece that gives you vintage vibes.

Painting a Festive Christmas Tree Wrap Up
There is no doubt that an easy Christmas tree painting can help get you into the holiday groove. However, keeping your painting simple doesn’t mean it has to be generic or boring.
If you add some glitter, glow, or even real Christmas tree lights, you’ll have something that will be a spectacular hit with family and friends.
So, go ahead and give these tips a try. Not only will you have a great piece of festive art, but you’ll also be filled with holiday cheer!