
Meet the Author

Artist | Owner of Squishing Paint | Educator - Sara brings over 40 years of creative experience, a decade of specializing in acrylic painting, and a passion for guiding new artists as they embark on their own artistic journeys


Hi there, friend! Today, I want to show you how to paint Christmas ornaments on canvas so you can create fun customizable gifts or Christmas décor that can be hung in multiple areas around your home.
From making my own holiday ornament canvas paintings, there are a few things that will either make or break your festive artwork and I’m going to let you in on them so you can bypass the frustration and knock your painting out of the park. Ready to get to the fun stuff? Let’s go!
Three Tips for Painting Ornaments on Canvas
Later, I’m going to share with you my YouTube painting tutorial recommendations but, first, let’s talk about parts of your holiday ornament painting that may trip you up.
In fact, these are challenges I’ve seen others battle with and either they can’t figure out how to fix the problem or they don’t even recognize what is causing their ornaments to look wonky! These issues aren’t really big things but they can make a huge impact on your painting if they aren’t done correctly.
Your Ornament String is more Important than you Might Think
Okay, so it’s not really about the string itself. It’s about the placement of the string on your ornament.
When learning how to paint Christmas ornaments on canvas, it’s going to be super important that you paint the string in the right spot. If you are off center by too much, it will throw the whole ornament out of whack.
Luckily, making sure that your ornament string is in the right place is really easy. All you have to do is to find the center of your ornament and then, using a ruler, lightly sketch in the string by extending it vertically out of the top of your ornament.
To make the string into a loop just find where the string would come out from the top of the ornament and start your loop there, widening it as you go up, curve around, and then bringing it back down to where you originally started.
As long as you make sure to get that spot centered, where your string comes out from the painted ornament, you’ll be golden!
Painting a Circle the Quick and Easy Way
You may have seen this little trick in my article with the vintage Christmas card tutorial, but it’s so good that I need to tell you about it again!
So, you could trace a template for your ornament onto the canvas using a jar lid, paper plate, etc. There’s also the option of throwing caution to the wind and freestyling it but I have a way to paint a perfectly round holiday ornament that is quick and so easy. It’ll blow your socks off, baby!
- If you have a mason jar lid ring, flip it upside down so that it’s flush with your canvas
- Hold it firmly in place while you paint the canvas that’s showing in the middle area of the lid ring
- Finally, lift the lid ring straight up and off by grabbing the edges on either side of the ring
You’ve just witnessed a Christmas miracle! Of course, this only works if the lid ring is big enough to paint the right size ornament on your canvas but it has the potential of making your life so much easier. Well, at least for the time that you’re working on your holiday painting, haha!
Transform a Circle into a Sphere
Before we get into this tip, let me just say that there is absolutely nothing wrong with keeping your ornament basic. Depending on how you plan to decorate your ornament, and what look you’re going for (farmhouse, glitzy, traditional, minimalistic, etc.), a flat circle may be the best option for your Christmas canvas art.
However, if you’re hoping to learn how to paint Christmas ornaments on canvas that look more 3D, there are a few things you need to know to make it happen.
Just like most things related to painting, it’s the highlights and shadows that are going to change the dimension of your painted ornaments.
There are many different ways to accomplish this but I’m going to show you how I go about it.
STEP 1:
The very first thing you’re going to do is to paint your round ornament in a color of your choosing (I used a festive red). Feel free to use the jar lid ring tip I mentioned earlier.
STEP 2:
Next, you need to decide where you want your light source to come from. You could have many different light sources if there are Christmas tree lights around your ornaments but let’s keep things nice and easy and just focus on one light source. Later, you can add in other light sources once you’ve got the basics down and are feeling more confident.

STEP 3:
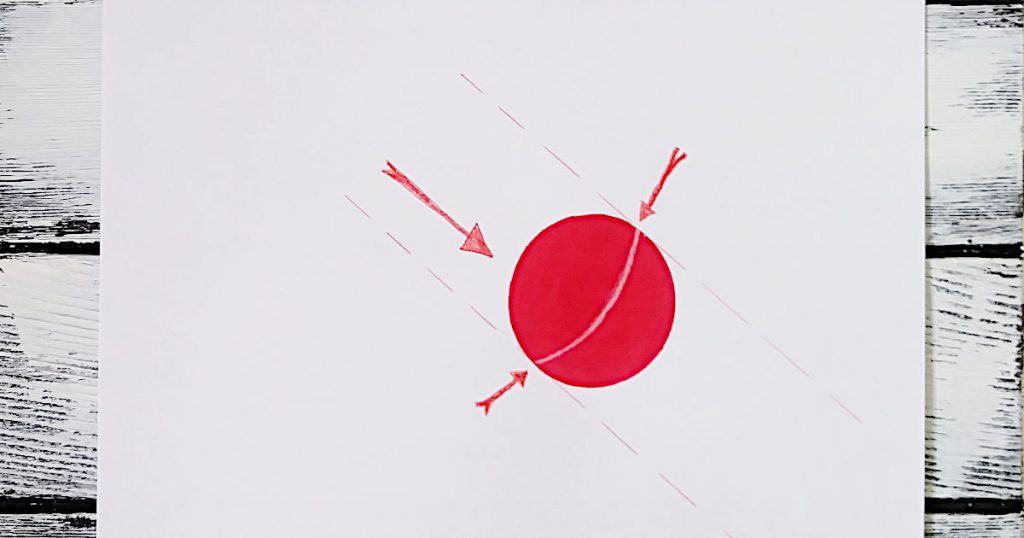
Now, using a ruler, draw some faint guidelines that follow the angle of your light source, making sure that the ruler is lined up with either side of your painted ornament.
Once you can see where your light source would touch the outside edges of your Christmas ornament, very lightly sketch a curved line from one side of the ornament to the other.
This is called the transformation line because it’s the furthest distance that the light can touch your ornament before it starts to slowly darken, the darkest shadow being the furthest away from the transformation line.
STEP 4:
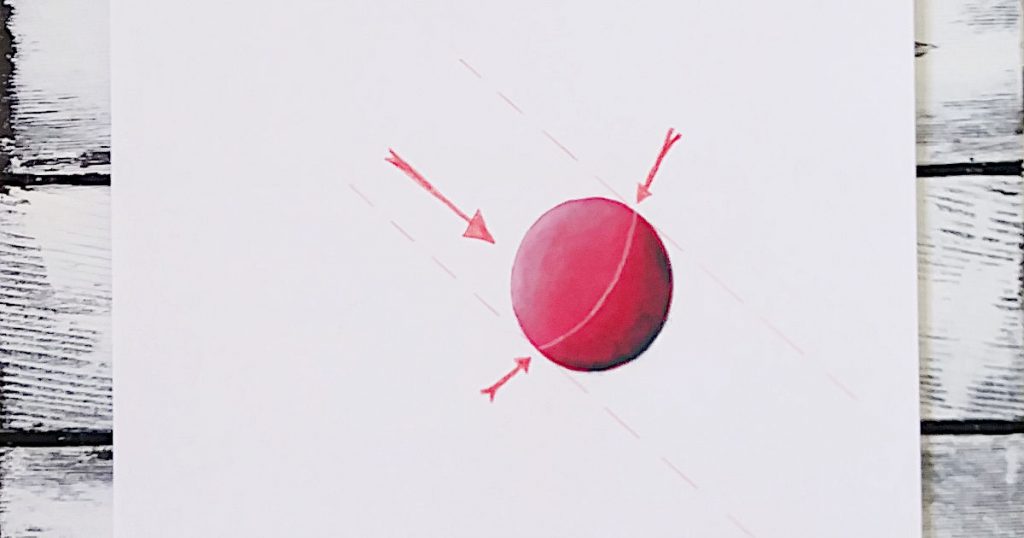
The next step is to start shading your holiday ornament. The goal is to have the lightest color transition into the mid-tone, that you painted in step 1, as you paint toward the transformation line.
You’re going to do the same thing with your shadow color, making sure that the darkest shadow is furthest away from the transformation line.
I know that, as a beginner in acrylic painting, you may not have all of the things like mediums that could help you to blend.
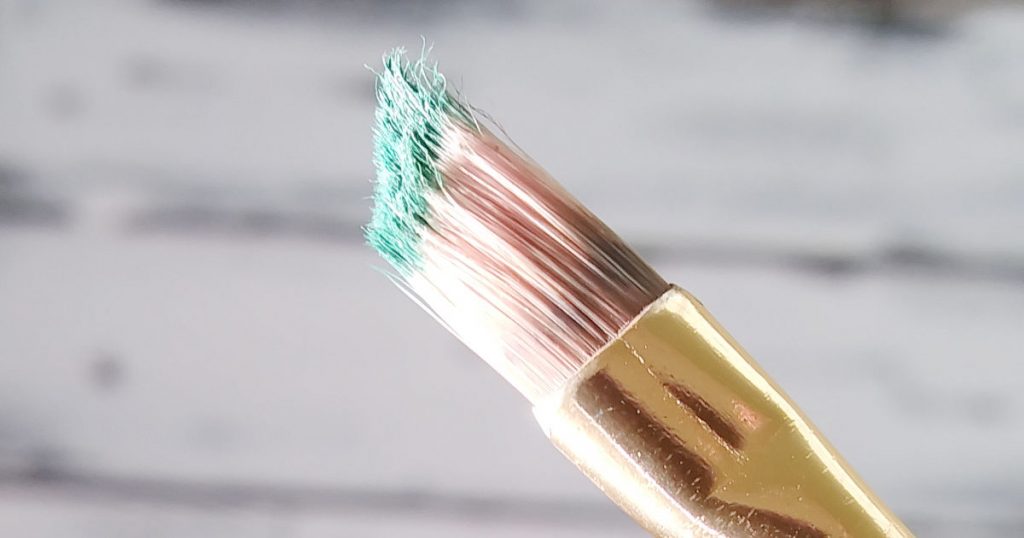
So, instead, we’re going to use a technique called dry-brushing. This technique will be used for all of our shading and, later, our highlights.
Make sure that you don’t use a brush that you are in love with. This technique is rough on the bristles so it’s better to use a brush that has seen better days (never throw out your old brushes!!!).
Although dry brushing can really kick the $%&@ out of your paintbrush, it’s a great option for blending. In fact, it’s so good that, even though I have a blending medium, it’s my preferred method! Here’s how I do it:
- Take a dry brush and load it with a very small amount of either your lighter color or your shadow color (depending on which side of the ornament you’re working on)
- Run your brush across a piece of paper towel just to make sure that you have very little paint on there
- Next, start where you want your color to be the most concentrated (so for the lightest shade you want to start at the edge of your ornament that’s closest to the light source, and for the shadow you want to start along the edge that’s furthest away)
- Now, you are going to scumble, which is just a fancy word for the motion you would use with a colored pencil to color something in (basically, you’re sketching with paint)
- You are going to scumble until your brush is no longer depositing paint
- If you feel like you need more paint, feel free to dip back in and wipe off the access but make sure to start again where you want the color to be either the brightest or darkest, depending on which side of the Christmas ornament you’re working on
If you don’t want to use the dry-brush method to add your light and shadow, check out my article on blending acrylic paint that will show you three additional ways to get those highlights and shadows just the way you want them.
STEP 5:
You can either erase the transformation line now or paint over it with a small bit of your mid-tone color (the color that you start with at the very beginning).
Either way, you’re going to want to scumble just a bit of that mid-tone color back in where the transformation line was. Be careful to keep this paint color near the center of your Christmas ball so that you don’t lose all of your highlights and shadows.
STEP 6:
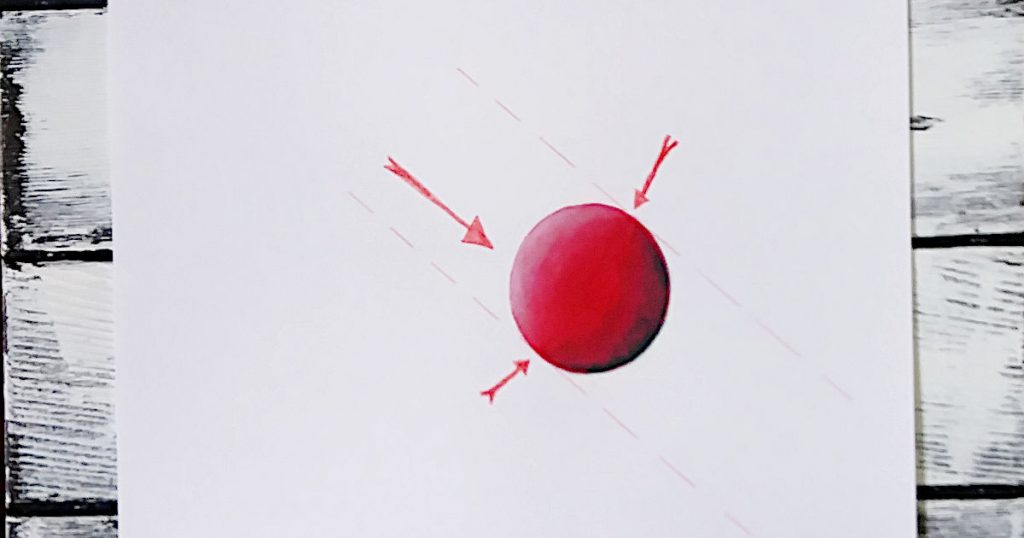
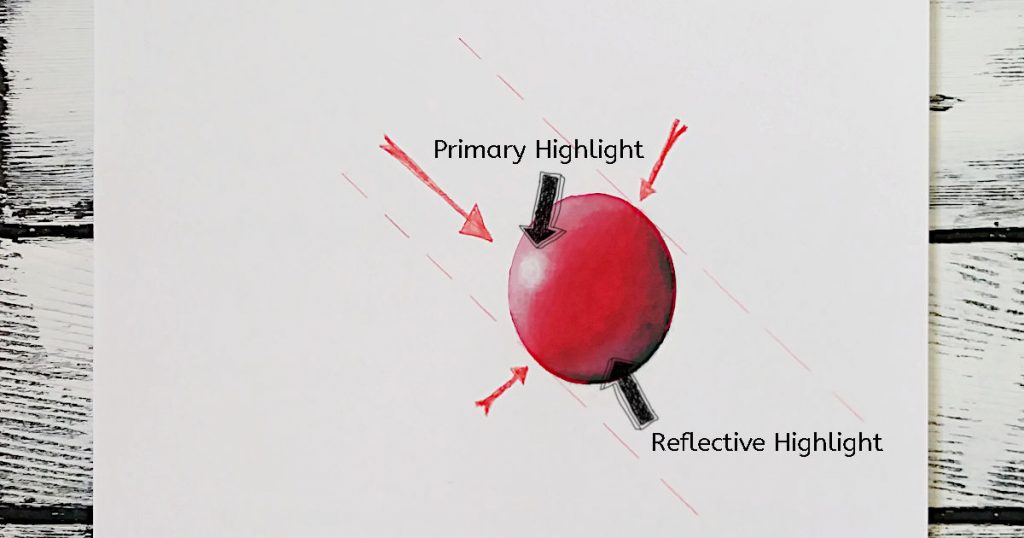
Lastly, we’ve got to add in the brightest highlight and a secondary highlight that’s located on the darker side of your ornament. Keep in mind, the crisper you make the edges of your highlight, the shinier it will make your Christmas ornament look. If you follow my instructions and find that your ball isn’t shiny enough just add a bit more paint and don’t scumble as much.
- Whatever color you used for the lightest part of your shading, add a bit of white to it and put a small amount on your brush. Make sure to wipe the majority of the paint off of your brush!
- Now, decide where you want to put your brightest highlight and start gently scumbling in a circular motion. Allow this to dry and then, using the exact same method, add a bit of pure white to the center of your highlight making sure to blur out the edges by very gently scumbling (I’m talking hardly touching the canvas).
So, the next highlight we’re going to add is called a reflective highlight. When light hits other objects close to your Christmas ornament, it will bounce off the surface and reflect back onto it.
To help with creating the illusion of a sphere, we’re going to paint the reflective highlight very close to the deepest shadows. Painting a slightly brighter spot that close to a very dark area will help to push the shadow back, as if it’s slowly fading from sight.
This slight highlight isn’t very bright at all and isn’t very big but it does help to give your circle the illusion of dimension so it’s pretty important.
Here’s how to add the reflective highlight:
- Deepen your lightest shading color so that it’s just barely lighter than the mid-tone/base color of your ornament
- Choose a spot on the dark side of the ornament and very lightly scumble a small rounded shape (don’t try to make it perfectly round and defined unless you’re going for a very shiny Christmas ornament)
- You might think that your reflective highlight is too dark but resist the urge to brighten it so that the focus stays on your primary highlight
Decorating Ideas for Your Christmas Ornament Acrylic Painting
After you’ve learned how to paint Christmas ornaments on canvas, you’re probably going to have so much fun doing it that you’ll want to keep making them over and over. But what to do with all of these fabulous ornament paintings?
See, the versatility of this holiday painting project is why I love it so much. You could literally find a way to hang this type of painting anywhere in your home!
To help you come up with a gazillion excuses to paint this Christmas ornament painting as many times as you like, here’s an epic list of decorating ideas!
- Paint 4 ornaments on the canvas, hanging at different heights, and paint B-A-T-H on each ornament for a festive touch in your washroom or on the washroom door
- Make one for each person’s bedroom door with their name on it
- Paint as many ornaments as there are members of your family and put their first name initial in each ornament as a holiday family tree
- On a piece of wood, paint a large ornament, add your last name initial, varnish it well, and hang it outside on your front door
- On really small canvases, paint an ornament, for each member of your family, with their name on it, attach a small piece of ribbon to the back, and hang them on your Christmas tree
- Paint one to place above each stocking hook, with names on them
- Don’t forget the pets! They deserve a beautiful Christmas ornament painting too! It would look so cute to paint a paw print on each ornament and then add their name (OMG, the squishy feels!)
These are just a few ideas to get you started but you could do so much with this design. Adjust the colors, wording, background, shapes of the ornaments, or anything else you want. Once you learn how to paint Christmas ornaments on canvas, you’ll never run out of gift-giving ideas!
YouTube Recommendations for Painting Holiday Ornaments on Canvas
“Blue Christmas Step by Step” by Painting with Jane
Even though this tutorial starts off with a paid promotion, this is a great one to teach you how to paint Christmas ornaments on canvas.
Not only do you learn how to paint the holiday ornaments, you learn how to free-hand bokeh lights as well. Don’t worry, though, if the thought of winging it through bokeh lights scares you, you can just use sponge pouncers.
Feel free to switch up the colors and composition!
“Holiday Ornaments” by The Art Sherpa
This is a great tutorial if you want to learn how to paint Christmas ornaments on canvas without the worry of trying to get the ornament string just right.
In this festive acrylic painting step-by-step, Cinnamon shows you how to quickly paint in your background, using something other than a paint brush, and how to paint a grouping of brightly colored Christmas ornaments.
Although this is a long video, it’s totally worth it because Cinnamon and her husband, John, are so fun and really know how to make a painting lesson an enjoyable experience.
Wrapping Up Our Ornament Canvas Painting
If you were wondering how to paint Christmas ornaments on canvas, so that you can make unique decorations for your home or as gifts, I hope this article has given you the confidence to give it a try.
Just remember that light, shadow, and shading are how you up your sphere game to really make your ornaments stand out. Plus, learning how to add dimension to a circle is such a useful skill for any round object you want to paint in the future!