Meet the Author

Artist | Owner of Squishing Paint | Educator - Sara brings over 40 years of creative experience, a decade of specializing in acrylic painting, and a passion for guiding new artists as they embark on their own artistic journeys


Some of the links in this article are affiliate links which means that if you choose to click on them and make a purchase, I earn a small commission at no extra cost to you.
Also, as an Amazon Associate, I earn from qualifying Amazon purchases.
For more details, please read the full disclosure here.
Thanks so much for your support!
Today, we’re going to practice how to paint grass for beginners. It’s one of those skills that will make future landscape paintings so much easier. It will allow you to focus on more challenging things like clouds, the bane of most beginner’s existence, am I right?!
As a new artist, who has probably searched high and low for information on how to paint grass for beginners, I’m betting you saw a lot of tutorials that included using a fan brush. I’m going to let you in on a little secret, you don’t need a fan brush to paint grass!
In this guided practice, I’m going to show you different brushes you can use to paint grass and what kind of look each brush creates.
Before We Get Started
There are a few things we should go over before we begin practicing how to paint grass for beginners:
- For every different brush, the stroke will be the same. Plant your brush on the surface and flick upward. The only thing that will change is the direction and the pressure you use
- Don’t try to make every blade of grass perfect. In nature, grass grows in every direction and every height. Even the color and thickness can be different. Loosey goosey is best
- Don’t go in a straight line with your grasses all pointing in the same direction. It won’t look natural and you’ll be disappointed
- Don’t put your highlights just at the tips of the grass or your shadows at the bottom. Put them in unexpected places to show that the grass is full and lush
Gather Your Tools

For this guided practice, you’ll need:
- Any surface to paint on (I just used printer paper)
- Any one, or more, of the following brushes:
- Round brush
- Angle brush
- Flat brush
- Fuzzed out old angle brush
- Fan brush
- Deerfoot stippler
- I used the following paint but you can just use what you have:
- Hooker’s Green (Liquitex Basics)
- Cadmium Yellow Medium Hue (Liquitex Basics)
- Ultramarine Blue (Liquitex Basics)
- Mars Black (Liquitex Basics)
- Titanium White (Golden)
- Jar of water
- An old rag for drying your brush
How to Paint Grass for Beginners
Painting Grass with a Fan Brush
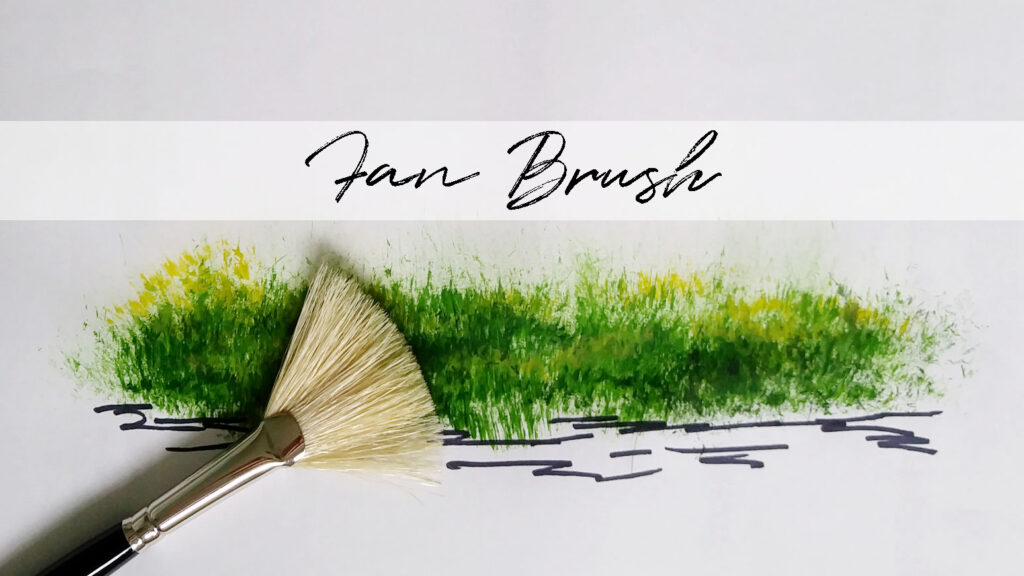
Okay, let’s get my least favorite one out of the way first. I’m not a “fan” of the fan brush (did you see what I just did there?).
I’m sure there are lots of artists out there that think the fan brush is the bee’s knees but I find it very awkward to use, as you can see from the photo above, haha. However, it is worth mentioning and giving it a try, just in case you’re a fan brush expert in hiding. Also, try to use a fan brush that has bristles on the stiff side so that they keep their form and don’t just smear the paint around.
A good bet for a stiff bristle fan brush would be one made from hog hairs. They are nice and stiff but they do tend to hold a lot of water so you might want to pat your brush dry a bit, after getting it damp in water, before loading up with paint.
STEP 1:
- Using a dry brush, load up with your green paint (you don’t want to put a blob of paint on the brush but you do want to cover the bottom part of all the bristles
- With the tip of the bristles pointing straight down, horizontally, plant your brush and flick upward
- At the end of your plant and flick technique, your brush should be completely off the surface
- Try using the shortest bristles of the brush and turning your brush vertically for longer grasses
- Try using different amounts of pressure and don’t forget to angle the brush in different directions so your grass isn’t completely uniform
STEP 2:
- Dip your brush into a bit of your yellow paint and mix it with your green
- Next, start adding white to your yellow/green mixture until you get a light lime green that leans more toward yellow
- Continue using the plant and flick technique but use very light pressure and shorter strokes
- Make sure to use this highlight color sparingly. You want to still be able to see the first green color you laid down
STEP 3:
- Lastly, wipe your brush off on an old rag to get rid of most of the paint
- Mix a bit of blue with your green to create a cool green
- Next, add a teeny tiny amount of black to deepen your blue/green shadow color
- Now, follow the same instructions from step 2, making sure to not use too much of this color or you’ll end up covering everything you just did
How to Paint Grass for Beginners Using a Deerfoot Stippler
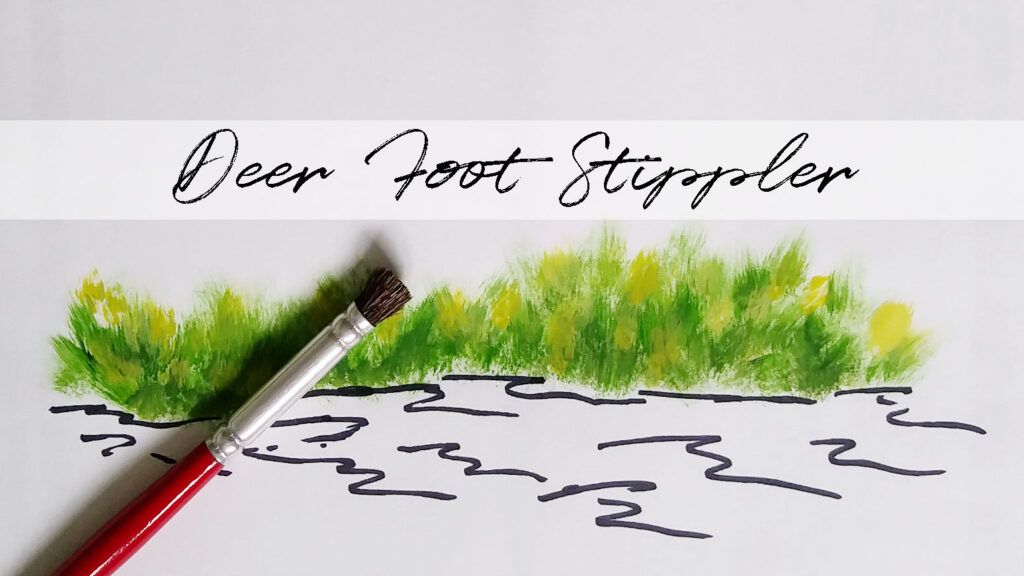
A deerfoot stippler brush is one of those brushes that people don’t talk about very often but that I find really useful for things like seafoam, speckles in the sand, and, of course, grass!
A deerfoot stippler is most suited when you want to paint grassy mounds. For example, let’s say you want to paint a desert landscape but you want to include scrub grass here and there. Or maybe you want to paint a landscape that is mostly rocks but with clusters of grass peeking up through the rocks. Both situations would be where a deerfoot stippler would make the most natural-looking grass.
As a specialty brush, it isn’t a mandatory brush when you’re first learning how to paint grass but when, and if, your budget allows, you might want to think about investing in one. It is a really sturdy brush, with short angled bristles, perfect for scrubbing and stippling.
STEP 1:
- Using a dry brush, take a bit of your green paint and, transferring it to a clean part of your palette, cover all of the bristles by using circular, scrubbing motions
- You don’t want to use too much paint or it will just look like a blob
- With the longest part of the angle pointed downward, and closest to you, plant and flick
- Experiment with pressure to see how thick or thin you can make your grass
STEP 2:
- Keeping your brush dry, and using the same scrubbing circular motion, mix your green, yellow, and a bit of white to create your highlight color
- You’re going to use the same technique as in step one but, this time, keep your pressure light and use shorter strokes
- As you’re adding your highlights, stop every once in a while to think about where you want the light to hit
- Continue until you’re happy with your highlights
STEP 3:
- Wipe your brush as clean as you can get it and mix your shadow color using green, blue, and a titch of black and still using the scrubbing circular motion
- You’re going to use the same exact technique as you did in step two but, now, keep your shadows down near the bottom of your grasses and anywhere you feel a shadow would be
How to Paint Grass with a Fuzzy Angle Brush
One of the tips I give in my beginner tips article is to keep your brushes that look like my hair on a humid day (it fuzzes out like a chia pet!). When it comes to learning how to paint grass for beginners, this would be your easiest option. Why? Well, because the brush already has bristles that are flared out, it’s going to be able to make natural-looking grass very easily.
My favorite type of fuzzed out brush would be the angle because you can make grass quickly and easily but then turn your brush vertical and use the very tip to make long grass, as well. Just because your beaten up brush looks like it’s been through the wringer, doesn’t mean you need to give it the ol’ heave ho.
STEP 1:
- Wet your brush and drag the access water off
- Load the brush with green paint and, holding it so that the ends of the bristles are horizontal, plant, and flick using light pressure
- Continue using this technique while changing the angle/direction of your strokes
- To make long grass, add a tiny bit of water to the longest bristles and tap off any drips. Next, load a bit of your green paint on to the longest bristles, plant it vertically, with the tip closest to you, and flick up using light pressure but a longer stroke
STEP 2:
- Mix your highlight color using green, yellow, and a bit of white
- Again, dip just the TIP of the longest bristles into your water and shake off any access
- Load your brush with a small amount of highlight color
- Turn your brush so that it’s vertical with only the longest bristles touching the painting surface, and closest to you
- Now, using very light pressure, plant and flick (the longer the stroke, the longer your grass will be)
STEP 3:
- Mix your shadow color using green, blue, and a tiny bit of black
- Use the same directions as shown in step two, keeping in mind where you think shadows would fall
- Don’t make too many shadows if your grass is supposed to be in full daylight!
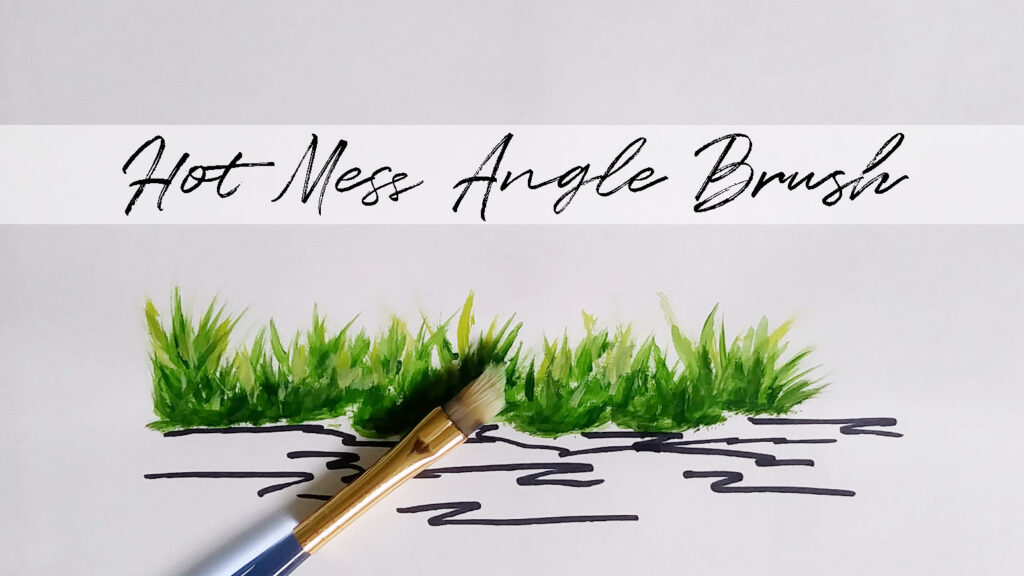
How to Paint Grass for Beginners: Angle Brush

I wanted to show you the difference between using a fuzzy angle brush compared to using a newer angle brush with a nice tight edge.
If you want to try painting grasses with an angle brush you can follow the same instructions as shown for the fuzzed out angle brush. Both work the same but a newer angle just takes a bit more work to create grasses.
Painting Grass with a Flat Brush
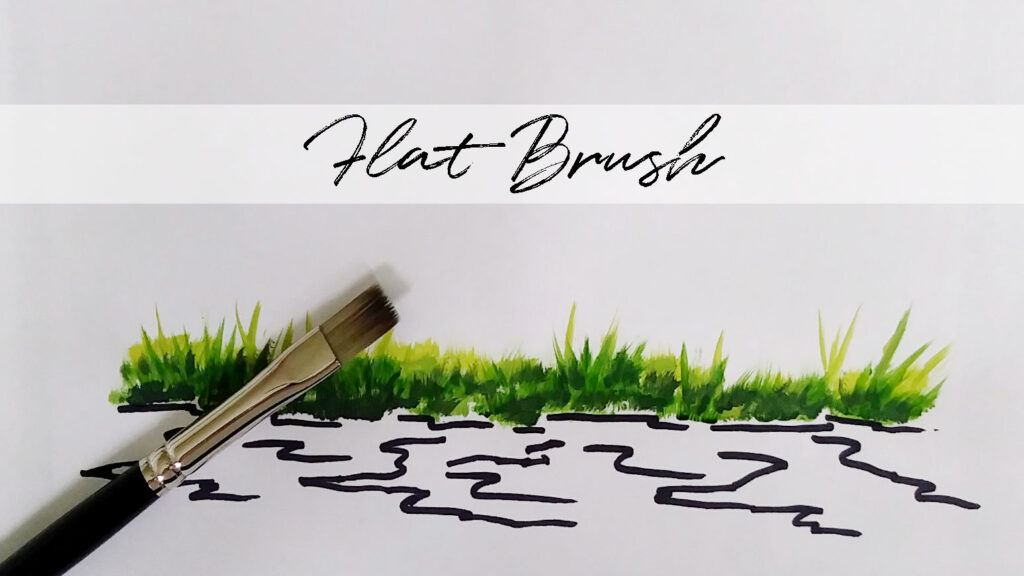
Using a flat brush to paint grass can be very challenging. If you look at my photo above, you can see that I struggled to make my grass look natural. However, I do think that there is a place for using it to paint grass.
The biggest example I could think of is if you wanted to paint a landscape that had a very well maintained lawn. I think it would be great for painting golf course greens. In this instance, having bristles that are uniform is a blessing, with just enough variation that you would see that it`s grass and not Astroturf. Using any other of the brushes mentioned would create a less manicured look.
On the other hand, you can turn your brush so the bristles are vertical and use it to paint long grass, as well. Keep in mind that the long grass will be straighter looking.
When using a flat brush to paint grass, you`ll be using the same technique as the angle brush but I would highly recommend using a different brush to do your highlights and shadows. My choice would be the deer foot stippler because it creates a shorter grass effect.
Using a Round Brush to Paint Grass for Beginners
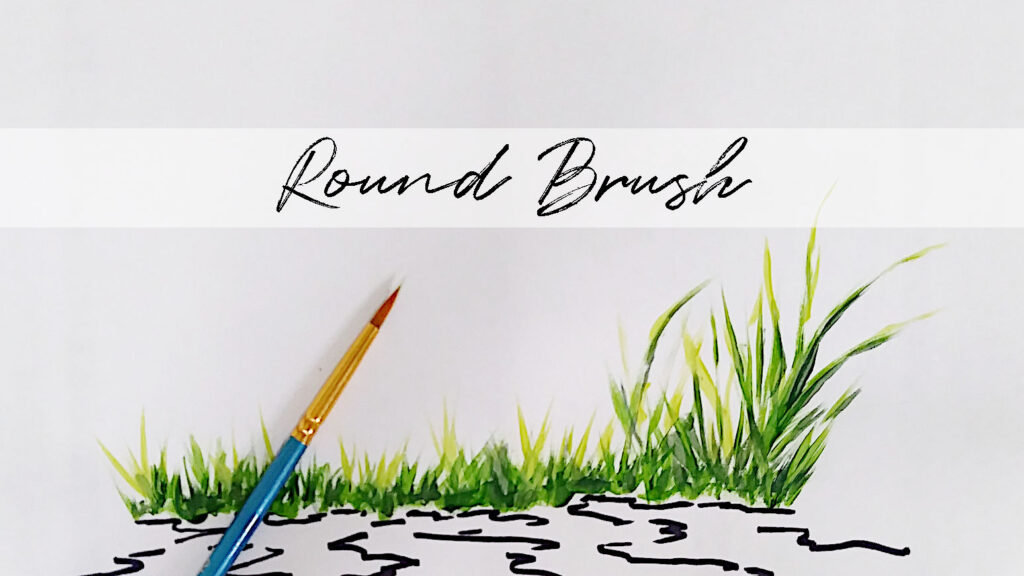
I love using a round brush when I’m painting the silhouette of grass. I’ve used a round brush to paint all kinds of grass but it makes the best long grasses, like marsh grass and beach grass.
As you can see, in the image above, the blades of grass are both well-defined but natural-looking at the same time. I wouldn’t suggest using it if you have a lot of grass to paint because it would take you forever! In that case, I would use a fuzzy angle brush to get the majority of the grass in and then go back with your round to add different lengths, highlights, and shadows.
As a beginner wanting to know how to paint grass, you might really enjoy using a round brush and I highly recommend it!
STEP 1:
- Dip your round brush into your water jar and knock it gently back and forth against the inside rim of the jar to get any drips off
- Poke your round brush into your green paint, and pull some out while rolling your brush between your thumb, index, and middle finger (this will help you get a sharp point on the tip of the brush)
- Gently place the tip of the brush onto the painting surface and lightly drag it upwards, using less and less pressure as you move from the bottom to the top of the grass
- Try different pressure to create thin and thick grass
- Twist your brush while dragging to create bends and twists in your grass
- Experiment with holding your brush close to the bristles and way back at the end so you can paint grasses that look as though they have different textures
STEP 2:
- Using a highlight mixture, from your green, yellow, and white, use the same method as in step one
- Keep in mind that you want to add fewer highlights and think about where the sun is and where it would hit the grass
- On tall grasses, the tops will have lots of highlights
- Don’t paint the full length of the grass with a highlight or it will look like a racing stripe!
- Using your highlight and shadow colors are how you can create the illusion of bends and twists in your tall grass so play with that
STEP 3:
- Create a shadow color using your green, blue, and black (easy on the black!!!)
- Continue using the same technique as in step one and two
- Note that shadows will be on the opposite side of the highlight
- Again, don’t start from the bottom and go all the way to the top with a shadow or it will just look like a big stripe
- Experiment with your placement of shadows in unexpected places. You can use them to show a twist in a blade of grass
YouTube Recommendations:
- Acrylic Painting How to Paint Tall Grass Quick and Easy – Studio Silver Creek
- Rustic Spring – Step by Step Acrylic Painting on Canvas for Beginners – Painting With Jane
- Sand Dunes Beach Sunset Seascape – Angela Anderson
Summing Up Different Ways To Paint Grass
There are so many people asking how to paint grass for beginners and with good reason. Although grass is an easy skill to acquire it can seem overwhelming for new artists.
My biggest tip for you is this: If your grass seems too flat and just like green paint smeared onto a canvas, use length, direction, shadows, and highlights to bring your grass to life. With practice, you’ll be painting grass like a pro!