Meet the Author

Artist | Owner of Squishing Paint | Educator - Sara brings over 40 years of creative experience, a decade of specializing in acrylic painting, and a passion for guiding new artists as they embark on their own artistic journeys


Ah, spring—the season of rebirth, vibrant hues, and a canvas waiting to be awakened with a few easy spring painting ideas! As nature bursts into life, so does our desire to create. Painting spring themes isn’t just about colors; it’s about capturing the essence of renewal and celebrating the beauty around us. Let’s dive into the therapeutic world of springtime painting.
How To Make Spring Come Alive On Your Canvas
Understanding the significance of composition and color palette is key to capturing the essence of spring in your acrylic paintings. The composition, or the arrangement of elements on your canvas, establishes the visual flow and impact of your painting. Choose a layout that highlights the freshness and vibrancy of spring, whether it’s through the placement of blooming flowers or the depiction of a lush landscape.
Equally important is the color palette – the hues you select play a crucial role in conveying the seasonal mood. Opt for a harmonious blend of pastel shades and vibrant tones to evoke the light, renewal, and beauty associated with spring. Mastering the interplay of composition and color allows you to infuse your acrylic paintings with the fresh spirit of the season, making your artwork a visual celebration of springtime.
Spring Compositions
Creating a captivating spring painting involves selecting a composition that truly embodies the essence of the season. To make your artwork scream “spring,” consider featuring iconic elements such as blooming flowers, lush greenery, and the soft play of natural light.
Choose a focal point that evokes the freshness and vibrancy of springtime, whether it’s a field of wildflowers, a serene garden scene, or a close-up of a ladybug or bumble bee balancing on a delicate petal. Play with light and shadows to enhance the overall atmosphere, creating a sense of warmth and tranquility.
Don’t be afraid to experiment with different compositions until you find one that resonates with the joy and beauty of spring – a painting that, at a glance, effortlessly transports viewers to the heart of this re-energizing season.
Spring Color Palette
In a spring painting, the choice of colors is paramount to capturing the refreshing and vibrant atmosphere of the season. Opt for a palette inspired by nature’s renewal, incorporating soft pastels such as gentle pinks, soothing blues, and fresh greens. These colors emulate the blossoming flowers, new leaves, and clear skies that define spring. Intersperse these delicate tones with brighter accents like cheerful yellows and lively purples to evoke the energy and vitality of the season. Consider the interplay of light and shadow in your artwork, using warm tones to create a sense of sunlight filtering through fresh foliage.
Word of warning, though. Be prepared to go through a lot of Titanium White paint. You’re going to go through way more white acrylic paint than you will colors. It’s kind of amazing how little color you need to add to white to make a pastel.
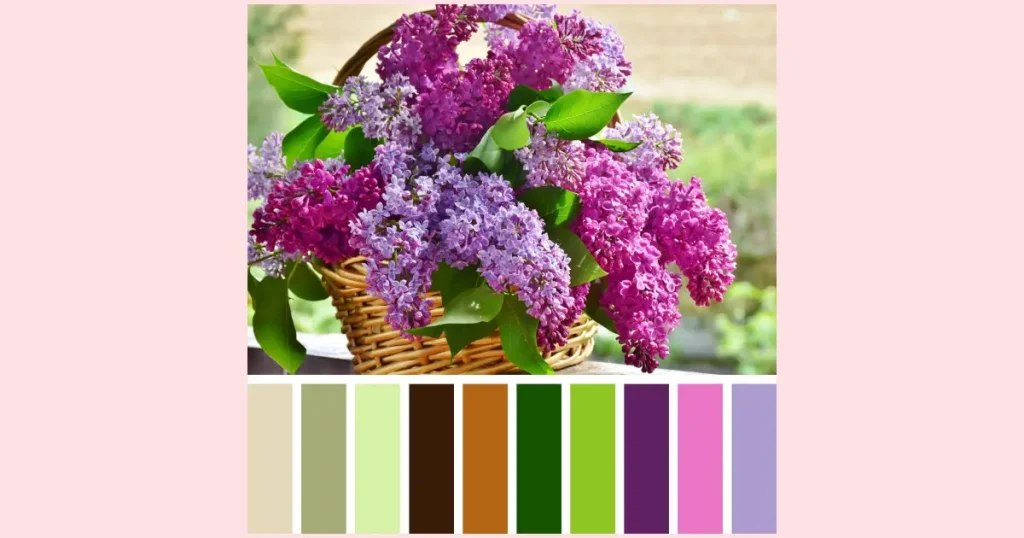
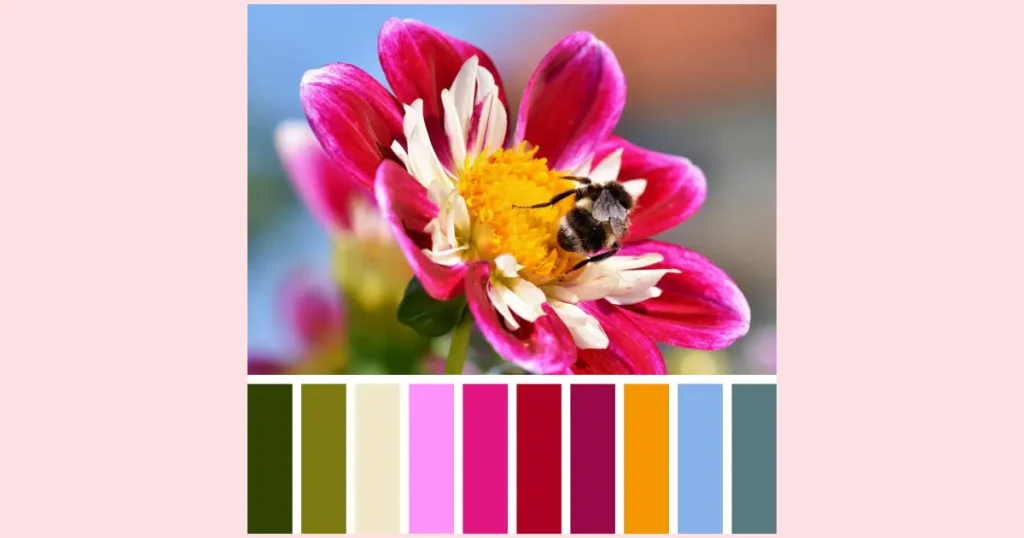
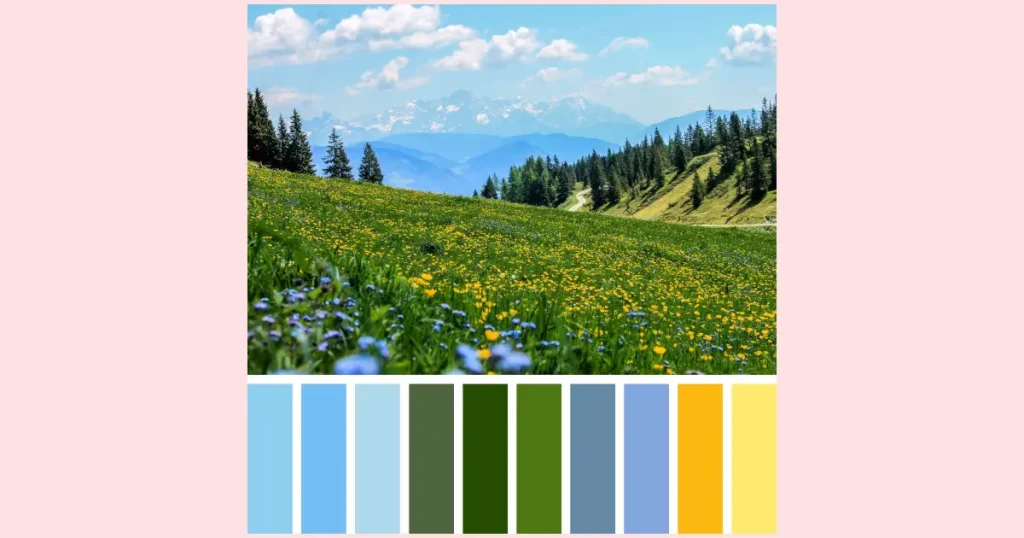
Listed below, I’ve given you some easy spring painting ideas along and I’ll also add a different reference photo with a coordinating color palette, so you get a bonus! The images are completely free and the links to each are included in case you’d like to try your hand at it. If you’d like to make your own color palette from the images, make sure to check out my article that teaches you how to come up with paint colors from an image.
Prompts for Easy Spring Painting Ideas
Idea #1: Spring Floral Still Life
Imagine a captivating spring still life painting that showcases a beautiful bouquet featuring tulips, daffodils, cherry blossoms, and lilies.
- Begin by applying a soft, pastel background, perhaps a gentle shade of lavender or mint green, to evoke the freshness of the season.
- In the center of the canvas, arrange a vase filled with the vibrant assortment of spring flowers. Use bright and pastel colors to capture the essence of each bloom.
- Paint tulips in various shades of pink, red, and white, daffodils in sunny yellows, cherry blossoms in soft pinks, and lilies in delicate pastel hues.
- Use simple brushstrokes to create the distinctive shapes of petals and leaves.
- Experiment with layering and overlapping the flowers to achieve a natural and harmonious composition.
- Consider adding a play of light and shadow to give dimension to the bouquet. Paint a gentle cast shadow beneath the vase to ground the arrangement.
- Enhance the overall atmosphere by including subtle hints of greenery, such as leaves and stems, to complement the vibrant colors of the flowers.
Idea #2: Landscape with Blossoming Trees
Paint a serene spring landscape that features trees in full bloom, with the delicate beauty of cherry blossoms, apple blossoms, or magnolia trees.
- Begin by applying a soft, sky-blue background to represent a clear spring day. You can add fluffy clouds if you want but totally not necessary if you find clouds stressful to paint.
- You might want to include a distant hill or mountain range painted in soft blues and purples to add perspective to your spring landscape, right from the get-go.
- In the foreground, depict a meadow or a grassy area.
- Paint several trees with branches adorned in blossoms, creating a picturesque scene of springtime abundance.
- You can focus on cherry blossoms with their pale pink hues, apple blossoms in shades of white and light pink, or magnolia blossoms in soft pinks and purples.
- To add depth to the landscape, vary the tones of green for the leaves on the trees and the surrounding foliage. Use lighter greens for new spring leaves and darker greens for more established foliage.
- Consider incorporating a pathway or a stream winding through the scene to enhance the sense of depth and tranquility.

Idea #3: Spring Gardens
Envision a delightful painting that captures the essence of a vibrant spring garden teeming with an array of colorful flowers.
- Begin by applying a soft, pastel background (are you noticing a theme here? haha!), perhaps a light blue, lavender, or even a mottled green background to give the impression of distant foliage.
- In the foreground, paint a lush garden bursting with flowers of various shapes and sizes.
- Incorporate iconic spring blooms such as tulips, daffodils, daisies, and lilies. Experiment with a lively color palette—bright pinks, yellows, purples, and whites—to convey the youthful exuberance of the season.
- Create depth and dimension by varying the height of the flowers and placing larger blooms towards the forefront.
- Add greenery with leaves and stems to complement the vibrant colors of the blossoms.
- Consider including a meandering stone pathway, a rustic bench, or even a vintage watering can to evoke the charm of a well-tended garden.
- To enhance the atmosphere, imagine a clear, sunny day with a gentle breeze.
- Add subtle shadows to the flowers and foliage to evoke the play of sunlight, creating a sense of movement and realism.

Idea #4: Rainy Day Scenes
Spring often brings rain, so consider painting a scene where raindrops delicately kiss vibrant flowers, creating glistening puddles adorned with reflections of nature’s beauty.
- Begin by painting a muted background using soft shades of gray or blue to emulate the tranquility of a rainy day.
- Capture the intricate details of rain-soaked petals and leaves, infusing them with a spectrum of lively colors.
- Opt for various shades of pinks, reds, yellows, and purples for the flowers, allowing the raindrops to enhance their saturation.
- Include subtle hints of greens for the leaves, creating a harmonious contrast with the vivid blossoms.
- Add playful elements like rainboots and an umbrella, strategically placed amidst the blooming garden, painted in cheerful colors like yellow or red.

Idea #5: Butterflies and Bees
Picture a sunny meadow filled with vibrant flowers, each attracting colorful butterflies and buzzing bees.
- Begin by applying light blue paint to the background to represent the clear spring sky.
- For the flowers, use basic shapes such as circles or ovals in various sizes to create a mix of blooms.
- Paint the flowers in lively colors like bright yellows, pinks, purples, and reds. Keep the shapes loose and playful to maintain a simple and approachable style.
- Next, add butterflies and bees using colors that stand out against the flower backdrop – consider shades of orange, yellow, and black for butterflies, and black and yellow stripes for bees. Add delicate wings to the butterflies using light and translucent colors.
- To enhance the scene, include thin, green stems for the flowers and perhaps a few leaves.
- Place the butterflies and bees gently hovering around the flowers, creating a dynamic and cheerful composition.
- For the finishing touch, consider adding a gentle shadow beneath the flowers to ground the scene.
Idea #6: Springtime in the Countryside
There are so many easy spring painting ideas for landscapes but let’s make a country inspired painting.
- Start by adding a light blue background to represent the sky.
- In the midground, depict a row of simple trees along the horizon. Use brown for the tree trunks and various shades of green for the leaves.
- Keep the tree shapes basic, using vertical strokes for the trunks and gentle, rounded strokes for the foliage.
- For the foreground, paint rolling hills or a grassy meadow. Use various shades of green to represent the lush, springtime landscape.
- Keep the brushstrokes loose and use a dabbing or stippling technique to add texture to the grassy area.
- Next, introduce a small river or stream into the scene by using light blue for the water. Add reflections of the trees and sky in the water with horizontal strokes.
- Incorporate a few flowers in the foreground using bright colors like yellow, pink, and purple. Keep the flower shapes simple, using dots or small strokes to represent blossoms.
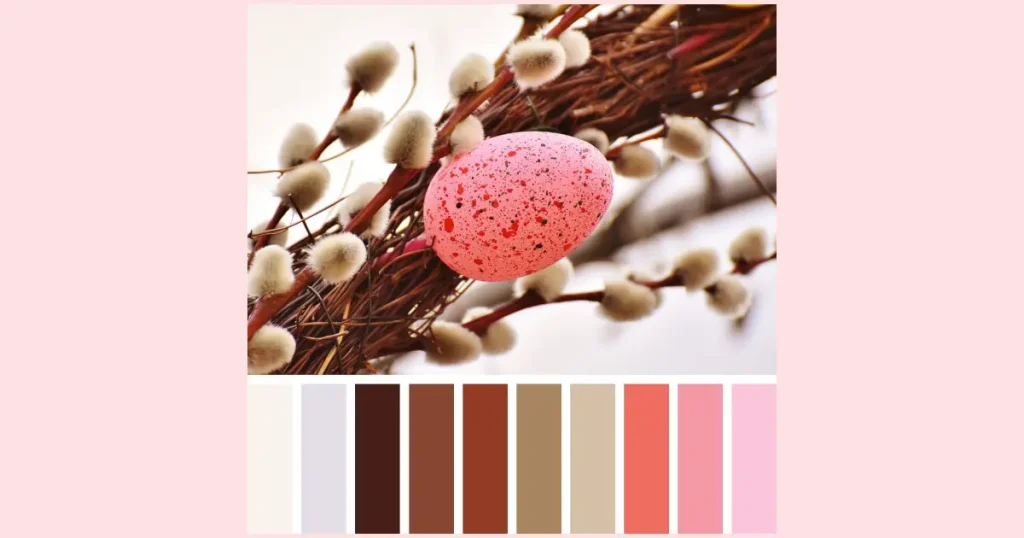
Idea #7: Easter-themed Art
Create a beginner-friendly Easter-inspired acrylic painting featuring tall grass, brightly colored Easter eggs, and a few simple clover flowers.
- Start by applying a light blue background to represent the sky. Add some puffy clouds if you feel like it but don’t sweat it if clouds give you an eye twitch.
- In the midground, paint tall grass using various shades of green. Use vertical strokes to create the grassy texture. Keep the strokes loose and uneven to give the grass a natural appearance. Don’t forget to change the angle of your brush strokes so you don’t end up with stick straight grass blades.
- Include some simple circle shapes to represent clover flowers, using pinky purples and white for the petals.
- Consider adding a few butterflies or bees using small, simple strokes in bright colors like yellow and orange. These elements can add a playful touch to the scene.
- Next, introduce brightly colored Easter eggs scattered among the tall grass. Paint eggs in various sizes and vibrant colors like pink, blue, yellow, and purple.
- Finish the painting by adding more grass so that the eggs look like they’re in amongst it instead of just sitting on top of it.
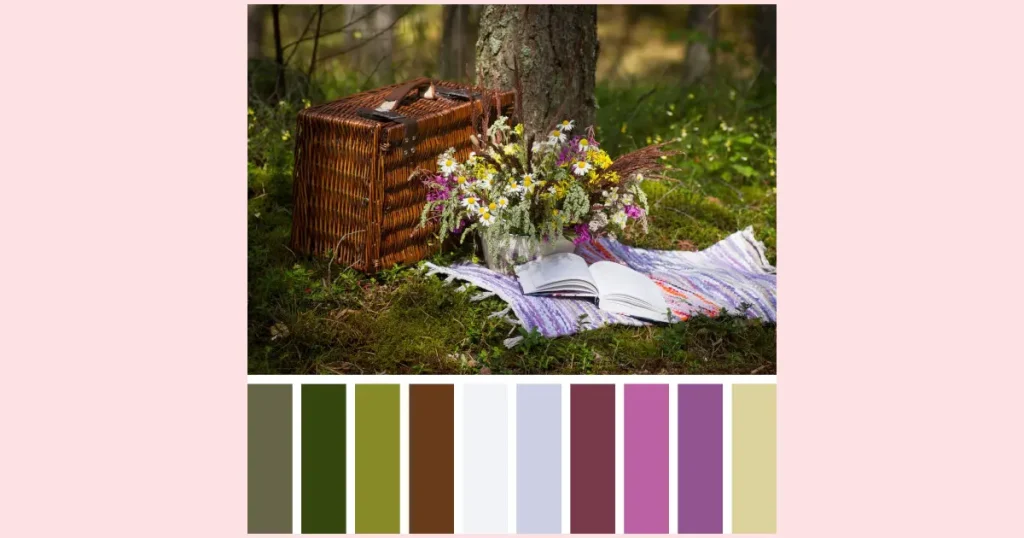
Idea #8: Outdoor Activities
How about an acrylic painting featuring a charming picnic basket?
- Paint a simple grassy area using various shades of green. Use loose brushstrokes to create a playful and textured effect for the grass. Don’t think too hard about each blade of grass. The point is to just give the impression of grass and the different greens will imply bright sunshine and shadows from the clouds.
- Cover your entire canvas with green lines that are thicker in some areas, bend in different directions and angles, and make some lines darker and some blades of grass more vibrant.
- Next, focus on the picnic basket.
- Paint a rectangular or oval shape in the foreground using warm, earthy tones such as brown. Add a simple handle by painting a curved line extending from the top of the basket.
- For a touch of detail, suggest the weave pattern of the basket by adding thin, horizontal lines across its surface. Use a lighter shade of brown or even white for these lines.
- To enhance the picnic atmosphere, add a few scattered items around the basket.
- You can paint simple shapes like circles or ovals in vibrant colors to represent fruits or snacks. Use reds, yellows, and oranges for apples or oranges, and maybe even a simple blue shape for a refreshing drink.
- Consider adding a small butterfly or two near the picnic basket for a whimsical touch.
Idea #9: Spring Bird
Picture a delightful painting featuring a Robin, the harbinger of spring, nestled among a backdrop of vibrant green foliage and blossoming flowers.
- Start by applying an out-of-focus foliage effect by lightly dab or stipple various shades of green, such as light and dark greens, on the canvas. Keep the brushstrokes loose and scattered to mimic the distant foliage. Use a light touch to blend the paint so there are no sharp edges showing.
- Next, paint the wooden fence or tree branch by using brown tones.
- For a wooden fence, create vertical lines with a darker shade for the wood grain.
- For a tree branch, paint a simple, curving shape with varying shades of brown to suggest texture.
- For the Robin, use a combination of brown, orange, and red for its feathers. Keep the shape simple, using a circle for the head, an egg shape for the body, and a skinny “U” shape for the tail. Paint a small, round eye and a tiny beak to add character.
- Place the Robin on the fence or branch, ensuring its colors stand out against the fresh, springtime background.
- If you have trouble with the legs or feet, just strategically place a flower or leaf where they should be and make sure to size the flower/leaf so that it covers at least a little bit of the Robin’s body. This will help give the illusion that the bird is perched within the foliage.
- Introduce spring flowers like daffodils, tulips, or cherry blossoms in the foreground. Paint simple shapes – elongated trumpets for daffodils and oval petals for tulips. Use vibrant colors like yellows, pinks, and reds for the flowers. Scatter them around the base of the fence or tree branch to create a lively and colorful atmosphere.

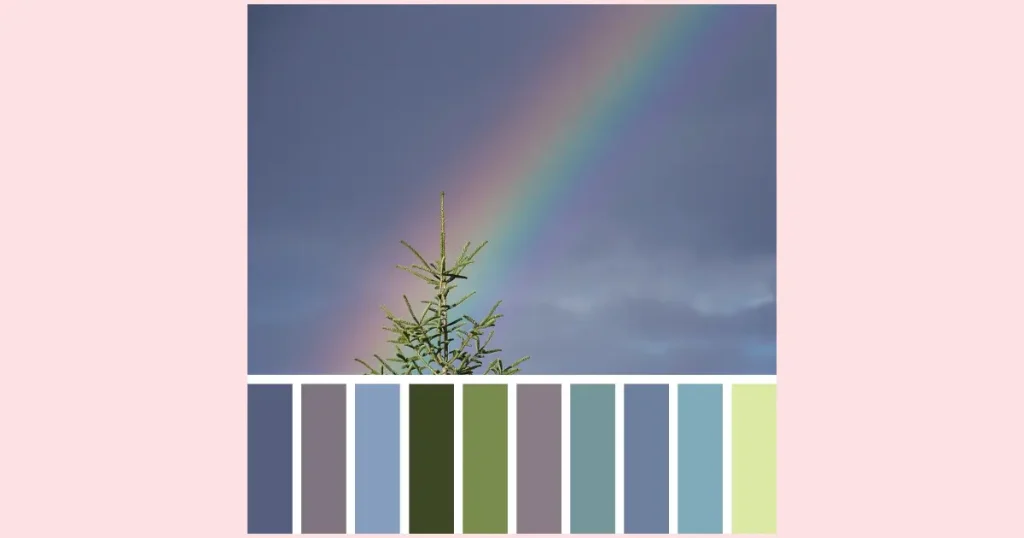
Idea #10: Symbolic Imagery
Let’s create an easy and joyful spring painting featuring a rainbow.
- Begin by applying different shades of gray for the background to represent a stormy sky. Use a mix of light and dark grays, blending them to create a dynamic and textured sky. This sets the stage for the vibrant rainbow to stand out against the dramatic backdrop.
- Add a touch of white or yellow at the top of the canvas, near one of the corners, to symbolize sunshine breaking through the clouds.
- Next add your rainbow starting at the light spot and arching down toward the bottom of your canvas. The sequence of colors should be red at the top, orange, yellow, green, blue, and purple at the bottom. Slightly blend each color into the next.
- Before adding your rainbow, paint the area white. This will ensure that your colors stay nice and vibrant.
- Blend your colors using a light touch and don’t overblend the colors.
- Use two brushes for blending – one for the warm colors and one for the cool colors. Green is your wildcard, you can use either brush to blend it into the yellow and blue.
- Use a vibrant green for the lower part of the canvas to represent a grassy field.
- You can add simple flowers in bright colors like pink, yellow, and blue, or keep it super simple by just creating rolling hills using different colors of green and adding a bit of yellow here and there to represent the sky brightening.
Spring Inspired YouTube Painting Tutorial Recommendations
I wouldn’t be doing you a solid without including a few curated YouTube tutorials in this list of spring painting ideas.
YouTube is a wealth of information to help you learn how to paint with acrylics but it can be completely overwhelming with the amount of tutorials on the platform.
To make it easy, and get you started, here are my top picks. I’ll tell you what you’ll learn and give you additional tips for success.
Spring Lake painting by Aham Art
I chose this easy spring painting idea because it features flowers in a meadow, with distant mountains, a beautiful blue sky, and a vibrant turquoise lake. Although there is no voice over, I love how short this tutorial is and it’s still easy to see what the artist is doing and includes paint colors on-screen.
In addition, this painting, like most, is totally customizable. You could leave it at just a few flowers or add more. You could finish without painting the bee or the man in the boat and it would still be a beautiful painting. When you’re a beginner, versatility is key.
Spring Lake painting | Seascape Painting | Acrylic Landscape Painting
Skills You’ll Learn:
- Clouds
- Multiple mountains and using color to create depth
- Grass
- Flowers
- Bee
- Distant man fishing in a boat
Additional Tips:
- You can slow down the video to better see how each brushstroke is created (setting (cog wheel) -> playback speed -> choose a lesser speed
- When the artist is painting clouds, notice how far back they are holding on to the brush and how little paint they are using
- When painting the flowers keep your brushstrokes loose and the shapes should look like U-shaped blobs – don’t think about them being flowers, think of them as petals swaying in the breeze
Bunny And Butterfly by Michelle the Painter
This is an amazing tutorial that showcases the cutest little bunny and a beautiful butterfly. I chose this one for you because, although it’s longer, Michelle is really good at giving direction. She gives you written step-by-step instructions, a materials list, and a link to a free download of the finished painting that you can print and use as a reference.
Michelle uses very painterly brushstrokes which is a great way to learn how to paint loosely and to trust the process.
Learn How to Paint “BUNNY AND BUTTERFLY” with Acrylic – Paint & Sip at Home – Step by Step Tutorial
Skills You’ll Learn:
- A blended background that looks out of focus
- Drawing a bunny using simple shapes
- Painting Fur
- Painting a Monarch Butterfly
- Grass
- Flowers
- Leaves and vines
Additional Tips:
- If you have trouble painting thin lines, you can use an acrylic paint pen
- When painting the background, use a light touch – you don’t want to move around all of the paint just a bit so barely touch the canvas with your brush
- The flowers in this painting are meant to be impressionistic so don’t get too fussy about them – flower petals are delicate and prone to flipping and flopping around in the wind (just tell yourself it’s a windy day in the painting and go with it)
Easy Way to Paint Lilacs by Joni Young Art
This is a super quick impressionistic painting of lilacs that focuses on the wet-in-wet technique. I love this tutorial because it uses lots of paint in a very care-free way. Joni does mention “the ugly stage”, which all paintings go through, and how important it is to work your way through it.
EASY Way to PAINT LILACS! Acrylic tutorial for all levels
Skills You’ll Learn:
- Painting wet into wet
- Using easy brushstrokes to achieve shapes
- How to paint leaves
- How to paint lilacs
Additional Tips:
- You don’t have to paint the entire canvas grey but I encourage you to try color grounds especially if you’re using a canvas that doesn’t take paint easily
- You don’t need to use a huge filbert brush to paint the background, any large brush will do
- If you don’t have filbert paint brushes, round or angle brushes would work
- The name of the game is to keep painting while the paint on the canvas is wet so make sure to use lots of paint
- The twigs are made by using a very thin brush with lots of water but, also, twisting and turning the brush in an upward motion through the wet paint that’s already on the canvas
- Hold your thin brush back further on the handle so your brushstrokes are wiggly and crooked (it makes it look more natural)
Final Thoughts On Painting Spring Compositions
These easy spring painting ideas are your ticket to infusing your canvas with the vibrant spirit of the season. Whether you’re captivated by blooming flowers, serene landscapes, or charming springtime scenes, these tutorials provide a gateway to expressing the essence of renewal and beauty.
Remember, mastering composition and color palette is key to capturing the freshness of spring in your acrylic paintings. That said, springtime painting isn’t just about colors on a canvas; it’s about embracing the spirit of renewal and creativity.
Don’t hesitate to experiment, and most importantly, have fun on your artistic journey.