Meet the Author

Artist | Owner of Squishing Paint | Educator - Sara brings over 40 years of creative experience, a decade of specializing in acrylic painting, and a passion for guiding new artists as they embark on their own artistic journeys


Some of the links in this article are affiliate links which means that if you choose to click on them and make a purchase, I earn a small commission at no extra cost to you.
Also, as an Amazon Associate, I earn from qualifying Amazon purchases.
For more details, please read the full disclosure here.
Thanks so much for your support!
If you’ve got spring fever, you’ve hopped to the right place. I’ve got some super cute rabbit painting ideas just for you! In this article, I’ll be serving up a delightful mix of acrylic painting prompts accompanied by reference photos and matching color palettes. Worried about which paint colors to use? Don’t sweat it—I’ve got you covered with my trusty suggestions.
As a bonus, I’ll be sharing my top YouTube recommendations for painting tutorials. Because let’s face it, who doesn’t love a good ol’ YouTube binge? I’ll break down why I chose each tutorial, what you’ll learn, and sprinkle in some extra tips to make your painting journey smoother.
Before we begin, let’s address the elephant in the room (or should I say, the bunny?): drawing skills. Sure, knowing how to draw a bunny might seem like a prerequisite for painting one but you don’t need to wield a pencil like Leonardo da Vinci to start slinging paint. Personally, I sometimes sketch out my subjects to understand how the shapes fit together, like solving a puzzle, but it’s totally optional. That said, I’ll give you a fantastic resource on how to draw a rabbit if you’d like to give it a try.
So, grab your bunny ears and let’s dive into the wonderful world of rabbit painting! And remember, even if your bunny ends up looking more like a blob than a cute cottontail, it’s all part of the artistic journey.
Bring Your Rabbit Painting Ideas To Life With The Right Paint Colors
Let’s talk about the essential colors you’ll need to bring these rabbit painting ideas to life on your canvas. We’re talking about your basic whites and blacks for those soulful bunny eyes and whiskers—because every bunny deserves a dramatic gaze, right? Then, dive into the world of browns, from rich chocolates to creamy cafe au laits, because let’s face it, bunnies come in all shades of adorable. And hey, don’t forget your grays for adding depth and dimension to that fluffy fur—because even bunnies need a little shadow play to look their best.
To paint rabbits, it’s handy to have a palette of basic colors along with some specific shades for fur and details so here’s my suggested list of acrylic paint colors:
- White: For fur highlights and accents – For any of the upcoming rabbit painting ideas you’ll want to have a tube of Titanium White. You could totally use a cheaper brand but be prepared to add lots of layers to create the lightness you’re looking for. Instead, Titanium White is the first tube of paint that I tell beginners to upgrade when they have the budget. You won’t regret it!
- Black: For fur and facial details – A tube of Mars Black would work well but if you don’t have any, don’t sweat it. I’ve got a whole article with free black paint recipes that you can make by mixing the colors you already have.
- Brown: A variety of browns for different fur tones, including cafe au lait, chocolate brown, and light tan – I highly suggest Burnt Umber, Burnt Sienna, and Raw Sienna. Not only because they make excellent bunny fur but they’re so useful for other painting projects. If you can only afford two, focus on the Burnt Umber and the Burnt Sienna. If you don’t have the budget for any new paint, check out my article that shows you how to make your own brown paint.
- Gray: For adding depth and shading to the fur – You could absolutely just mix your black and white together to make a gray but sometimes you need a gray with a certain undertone so make sure to add some Burnt Umber to warm the gray up or Ultramarine Blue to cool it down.
- Pink: For the inner ears and noses of some breeds – This is especially true for white rabbits but you’ll want to have a pink that’s more natural looking and not something that looks like bubblegum. My suggestion is to mix whatever red paint you have with white and slowly add in some yellow until you have the desired color.
- Yellow: For highlights or accents in the fur – Yellow Ochre/Oxide would be a fantastic yellow to use because it’s very natural-looking
With these colors, you’ll have a good starting point to capture the natural beauty of rabbits in your paintings.
Rabbit Painting Ideas and Prompts
Cottage Decor Inspired Spring Bunny
Let’s start with something cute and simple—a weathered cottage-style bunny face.

Before we get into the guided prompt, here are some acrylic paint colors I would suggest based on the image and collage above:
Background:
- Titanium White
- Mars Black
- Ultramarine Blue (just a bit to give the gray just a hint of blue)
Cherry Blossoms and Branches:
- Burnt Umber and Mars Black (for the branches)
- Mixture of Quinacridone Magenta and Cadmium Red Medium
- Titanium White
- Hooker’s Green (for a few leaves or parts of the stems)
Water Pitcher:
- Titanium White
- Mars Black
- Ultramarine Blue (for a tiny bit of a blue tint to the vase)
Wooden Bunny:
- Burnt Umber
- Titanium White
- Mars Black
Painting Instructions:
Background (Soft Pastel Background):
- Start by preparing your canvas with a medium-toned gray or a soft, pastel-colored background. You can use shades of blue, green, or purple to create a gentle, springtime atmosphere.
- Apply the background color evenly across the canvas using a large brush or a sponge. Blend the colors smoothly to avoid harsh lines.
- Once the base color is dry, add some subtle texture to the background by lightly dabbing a slightly lighter or darker shade of the background color with a sponge or a dry brush.
Mid-ground (White Vintage Water Pitcher with Cherry Blossoms):
- Begin by sketching the outline of the white vintage water pitcher and the branches of pink cherry blossoms using a light pencil or piece of chalk.
- With a medium-sized brush, fill in the water pitcher using very pale blue paint. Keep the strokes smooth and even to mimic the smooth surface of the pitcher.
- Next, paint the branches of pink cherry blossoms using a dark brown color. Add a few leaves, using a light spring green, if you want.
- Once the branches are painted, start adding your largest cherry blossoms using a light pink or pinkish-white color. Start with the main branches and then add smaller branches and blossoms extending from them.
- Once that has had time to dry, add delicate details to the cherry blossoms using a smaller brush and a darker shade of pink. Paint small dots or strokes to represent the centers of the blossoms and add depth to the petals.
- Finally, add highlights to the water pitcher by lightly brushing on white. Focus on areas where light would naturally hit, in this case, that would be the right-hand side of the pitcher.
Foreground (Wooden Bunny Cut-out):
- Begin by sketching the outline of the wooden bunny cut-out using a light pencil or a piece of chalk. Pay attention to the shape and proportions of the bunny’s head and ears.
- With a medium-sized brush, fill in the bunny cut-out using light brownish-gray paint (just mix a tiny bit of black to your white and then mix it with your brown).
- Next, dry brush a very thin layer of white paint over the bunny to make it look like worn wood. You want the white paint to kind of skip over the brown of the cut-out and be very thin so wipe off the majority of the paint from your brush and use a very light touch.
- Once the white paint is dry, add details to the bunny cut-out using black paint. Paint the eyes, nose, and whiskers in a simple, cartoon-like style. Keep the features bold and easy to distinguish.
- To finish, add a touch of charm by lightly brushing on some pink paint to the inner ears of the bunny cut-out, mimicking the blush of cherry blossoms.
Spring Meadow Bunny Ears
Imagine a picturesque scene—a spring meadow teeming with life, where rabbits roam amidst lush grass.
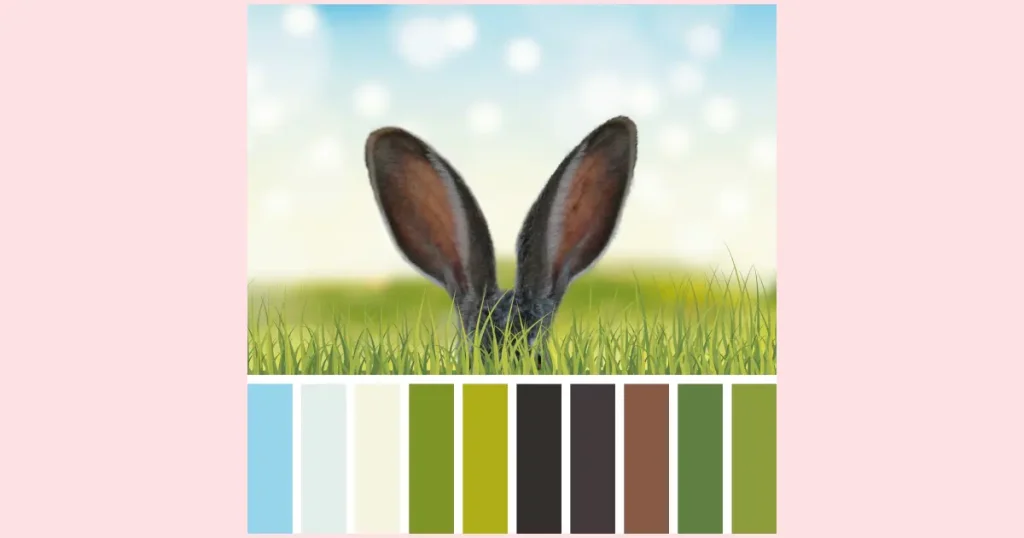
Here are some suggestions for paint colors to use:
Sky:
- Cerulean Blue
- Titanium White
Distant Grass:
- Sap Green
- Cadmium Yellow Medium
Bunny Ears and Head:
- Burnt Umber
- Mars Black
- Titanium White
Close-up Grass:
- Sap Green
- Titanium White
Painting Prompt Instructions:
Background:
- Apply a light blue color for the sky using a large brush. Blend it downwards into a very light bluish-gray near the horizon for a fading effect. (Consider brushing clean water on your canvas before starting to paint. This will help the paint blend easier)
- With a small brush, add a few subtle, out-of-focus white clouds in the sky. Keep them simple and spaced out to maintain a realistic feel.
Mid-ground (Grassy Meadow):
- Using a medium-sized brush, paint the blurry, bright green grassy meadow. Keep the strokes loose and random to suggest the texture of grass without focusing on details. Use a firm hand to lay the paint down on the canvas and a super light touch to soften the edges.
- Remember, simplicity is key here. Just focus on covering the lower part of the canvas with varying shades of green to indicate the grass.
Foreground (Bunny Ears and Head):
- Sketch the outline of the bunny ears and the top of the head using a light pencil or chalk.
- Fill in the ears with light brown paint, leaving the inner ear area blank for now.
- Paint the inner ear area with a mix of pale pink and very light brown, making the bottom of the inner ear fade into darkness by using a darker brown.
- Add a thin layer of white fur outlining the pink inner ears. Keep the strokes gentle and soft. Making your paint slightly more watery than normal helps the paint flow off the brush.
- Mix different shades of brown with a touch of white to paint the top of the rabbit’s head. Blend the colors together to create a natural look.
- To add a bit of texture to the fir, use a small round brush with watered down paint to make short tufts of fur that stick out past the top of the bunny’s head.
Final Touches (Blades of Grass):
- Paint the blades of grass in the foreground using various shades of green. Vary the height, width, and angle of the grass to make it look natural and hide where the rabbit’s face should be.
- Use a small brush to add highlights to the grass blades
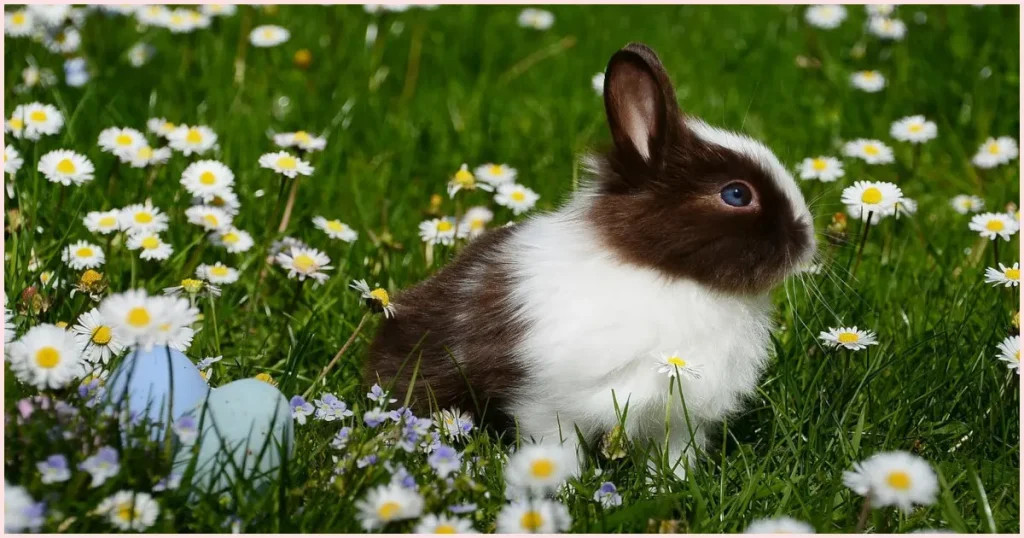
Bunny With Floppy Ears Having A Snack
Ready to paint a picture-perfect scene straight out of a springtime dream? Meet our fuzzy friend, the adorable bunny with long floppy ears and a brown coat adorned with whimsical spots of creamy white.
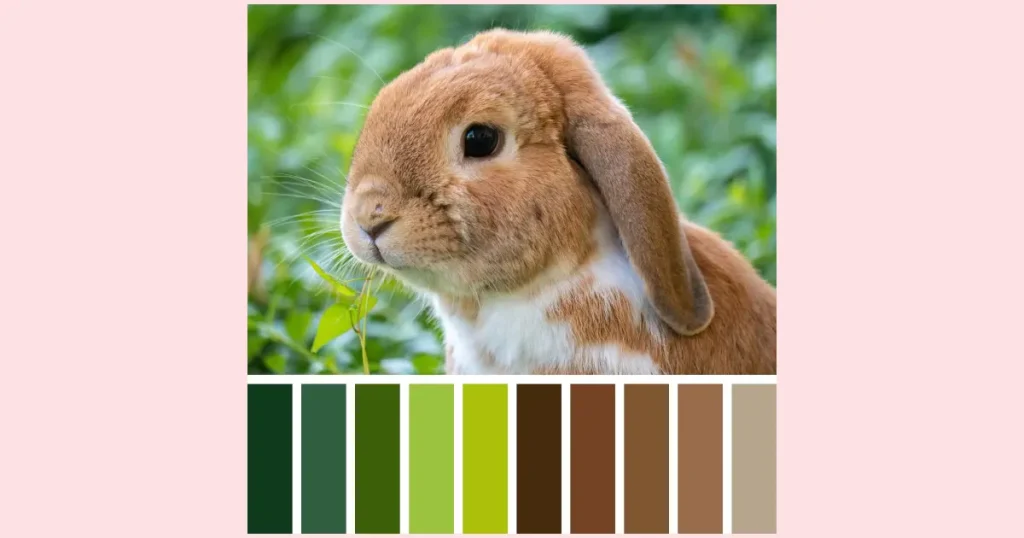
My favorite color picks, based on the above image collage, are:
Blurry Background:
- Hooker’s Green
- Titanium White
- Sap Green
- Cadmium Yellow Medium
Bunny:
- Burnt Umber
- Burnt Sienna
- Titanium White
- Mars Black (for the eye and deep shadows)
Painting Prompt Instructions:
Background (Blurred Greenery):
- Start by painting the canvas in various shades of green, ranging from dark to pale and with hints of yellow-green. Keep the colors blurry and impressionistic to suggest the warmth of sunlight filtering through foliage. Again, use firm pressure to lay the paint down followed by a light touch to blend and soften the edges.
Foreground (Bunny Close-up):
- Sketch the outline of the bunny’s head, ears, and body using a light pencil or piece of chalk. Position the bunny slightly off-center to create visual interest.
- Fill in the bunny’s fur with a cafe au lait creamy brown, leaving areas for the creamy white spots around the eyes, nose, mouth, chin, and chest.
- Add the large spots of creamy white and make sure to keep the shapes irregular and organic to mimic natural markings.
- Paint one beautiful big brown eye with a smaller brush, ensuring it’s expressive and lifelike. Add a black iris, and a few dots of white for highlights to make the eye sparkle.
- Use a fine brush to paint the long white whiskers coming out of the bunny’s cheeks and above its eyes. Keep the strokes delicate and flowing. Use extra water to thin your paint, don’t load globs of paint on your brush, and use a feather-light touch.
- Paint a stem with a few leaves hanging out of the bunny’s mouth using a bright yellow-green color. Keep it simple and suggestive, as if the bunny is mid-chew.
All of these painting prompts are meant to be short and sweet to give you the opportunity to use your own creativity to complete the project. Don’t be afraid to experiment with different brushstrokes and techniques to achieve the desired effect.
YouTube Painting Tutorial Recommendations
Check out these easy rabbit painting ideas perfect for beginners:
Cherry Blossom Bunny by Michelle the Painter
I chose to include this tutorial in our list of rabbit painting ideas because its main focus is on the bunny’s face. Michelle has some easy tips for painting fur and eyes and you get a really good look at what she’s doing. Plus, Michelle is great at explaining what she’s doing while she’s doing it.
What You’ll Be Practicing:
- How to paint a blended background
- Create a blurred effect in the background
- Painting grass
- Painting cherry blossoms
- How to sketch a very basic bunny face
- Easily paint eyes
- How to paint fur
- Painting whiskers
- How to paint a bunny nose
- How to paint bunny ears that are angled differently
- How to use different lengths of brush strokes to imply the directionality of the flower
- A bit of wet-into-wet painting
Extra Tips:
- If you don’t have a Bristle Brush, I would recommend using any brush that has firm bristles
- To dry between layers/steps, use a hairdryer on the lowest heat setting and sweep it over the canvas continuously until dry
- To add a bit more life to the rabbit’s eyes, consider watering down a bit of dark brown/black paint, loading your brush with the tiniest amount, and adding a small shadow where the eye meets the eyelashes. That will give the illusion that those lashes are nice and long and it will also help to give the eyes that orb shape
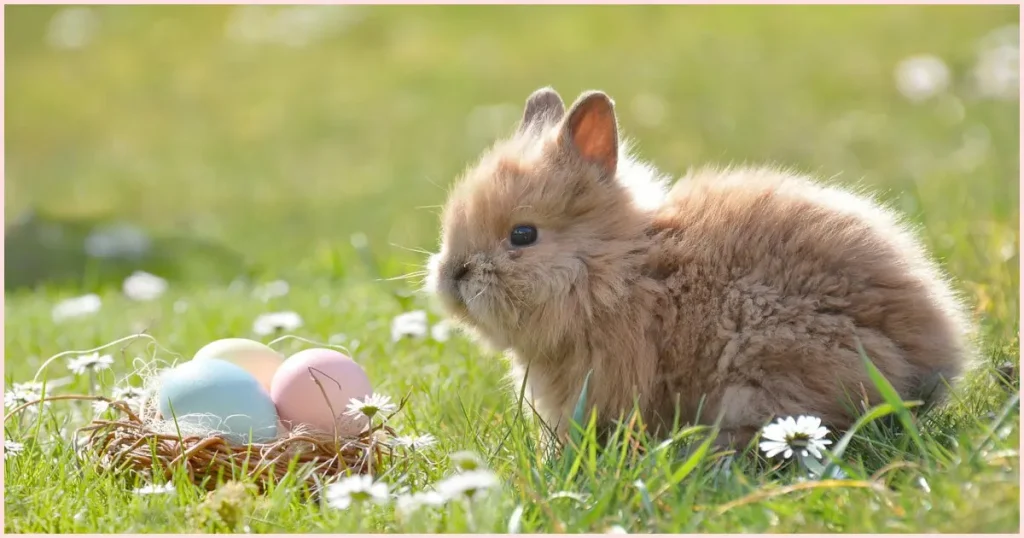
Easy Way to Draw a Cute Rabbit / Acrylic Painting for Beginners by Joony Art
How can anyone resist a cute bunny butt? I mean, come on! This one might be seen as more challenging because there are no instructions except for what you’re seeing the artist do. That said, I still think this one would be pretty easy and even if you don’t do it exactly like it’s shown, you’re still going to end up with a super cute painting!
What You’ll Be Practicing:
- How to paint clouds
- How to paint distant trees
- Paint easy grass
- Paint a bunny lying down
- Use shadows and highlights to create shape and definition
- How to paint bunny ears from behind
- How to paint a bunny tail
Extra Tips:
- Here are some paint substitution suggestions
- Cerulean Blue – Cobalt Blue
- Permanent Yellow – Cadmium Yellow Medium
- Vermillion – Cadmium Red Medium
- I recommend watching the whole video through first to get the gist of it and then going into the settings (cog wheel icon) in the bottom right corner, clicking on playback speed, then choosing a slower speed so you can really see everything that’s happening (don’t forget to mute or the super slow music will drive you absolutely bonkers)
- Although the artist doesn’t spend a whole lot of time showing you how they add the fluffiness to the fur or the grass in front of the bunny, you’ll basically be making a ton of skinny lines (the grass will use a mix of blue and yellow, that’s sometimes more blue than yellow and vice versa, and a bit of white for highlights)
How To Paint An Easter Bunny, Eggs, And Flowers by Joni Young Art
Joni Young uses bright beautiful colors and easy shapes to create a lovely composition of a bunny sniffing the flowers. Guys, it’s so adorable!
But, what I love most about it for you is that Joni uses basic shapes that don’t look anything like a rabbit and you start thinking “How in the world is this going to end up as a bunny?!” but it does! It’s like freaking magic! Using really basic shapes that don’t immediately make sense is a great exercise in learning how to paint what you see instead of what you know something should look like. It forces you to trust your instincts and not overthink it.
In addition, Joni shares some really great tips throughout the video to help you with your painting process
What You’ll Be Practicing:
- How to paint a blended sky
- Painting green moss
- Paint impressionist flowers
- How to paint a bunny with its head turned
- Painting Fur
- How to paint eyes
- How to paint bunny ears
- Painting Easter eggs
Extra Tips:
- Here are some paint substitution suggestions
- Blue Turquoise = Mix a bit of phthalo green to phthalo blue (I also have an article where you’ll find tons of turquoise paint recipes)
- Primary Yellow = Cadmium Yellow Medium
- Light Olive Green = Try mixing phthalo green with titanium white and then add a bit of yellow ochre/oxide and a bit of Hansa Yellow or Cadmium Yellow Light (you want to use a lemony yellow)
- Sap Green = Hooker’s Green with a bit of Cadmium Yellow Medium mixed in
- To make the eyes sparkle even more, try mixing Joni’s method with Michelle the Painter’s technique for bunny eyes
- If you’re like me and can’t stand a fan brush, try painting the fur with an old scruffy brush whose bristles have separated and are fuzzy (these make the best fur for me)
- If you don’t have Filbert paintbrushes (although, I highly recommend them!) you can also try doing the techniques with a round brush
Drawing A Cute Rabbit (Optional)
So, you’re curious about drawing rabbits, huh? ArtLex has a fantastic tutorial that gives you step-by-step instructions. You’ll be sketching bunnies like a pro in no time, even if you think you can’t draw.
Now, I know what you’re thinking—drawing fluffy little rabbits might seem daunting, but this tutorial breaks it down into simple, easy-to-follow steps. I’m telling you, from capturing those adorable ears to nailing those whiskers just right, you’ll be amazed at what you can create.
But hey, here’s another reminder for all you beginners to acrylic painting: drawing a bunny isn’t necessary for painting one! Sure, mastering the art of sketching can be a fun challenge, but it’s not a make-or-break deal when it comes to painting. So, if you’re feeling a bit shaky with a pencil, don’t worry about it! Remember, painting is all about expressing yourself, so don’t let a lack of drawing skills hold you back from painting your next masterpiece.
Final Thoughts on Easy Bunny Paintings
As we come to the end of our journey exploring easy rabbit painting ideas, it’s so important to me that you remember that you don’t need to be a master at drawing rabbits to bring these charming creatures to life on canvas. Although it can certainly enhance your painting skills by helping you understand the fundamental shapes needed to create a realistic bunny.
Armed with a palette of essential colors, you have the tools, and the guidance from the painting prompts, to craft charming bunny scenes bursting with personality. If you’d rather follow along with some great YouTube acrylic painting tutorials, you’ve got some super cute bunny options to get you started, and you’ve even got my own tips to give you the upper hand.
Always remember, painting is all about having fun and embracing your creativity, so don’t be afraid to experiment and let your imagination run wild. Happy painting, and may your bunny creations hop right off the canvas!