Meet the Author

Artist | Owner of Squishing Paint | Educator - Sara brings over 40 years of creative experience, a decade of specializing in acrylic painting, and a passion for guiding new artists as they embark on their own artistic journeys


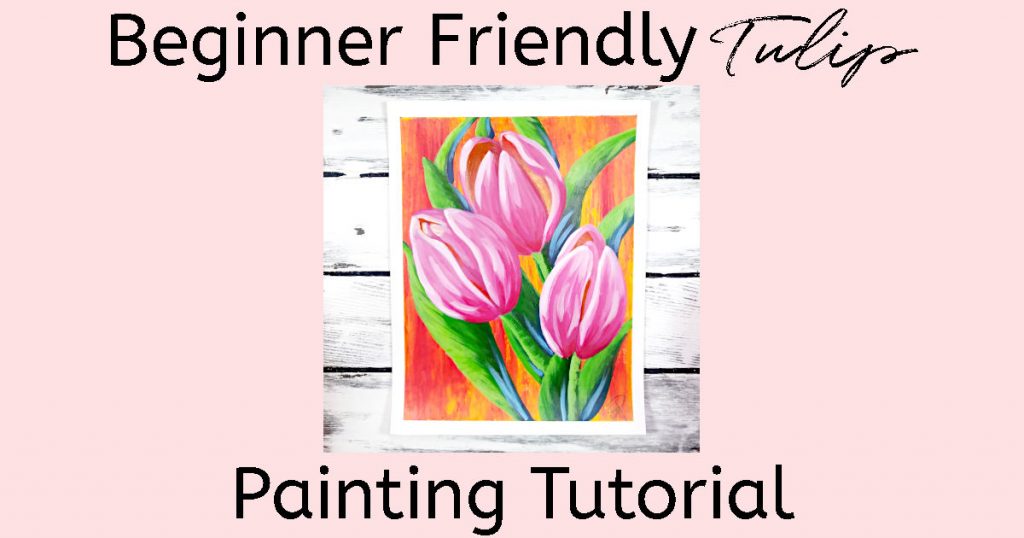
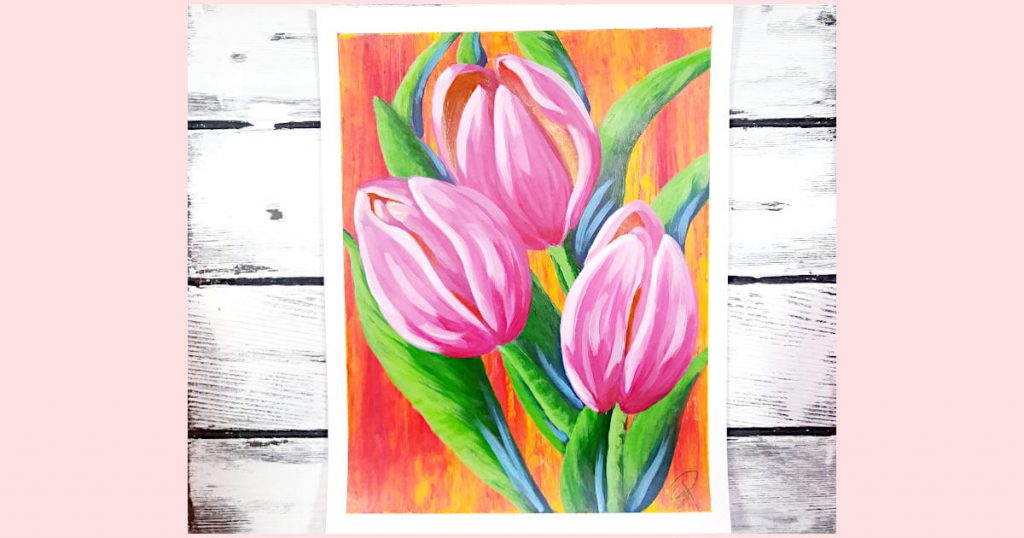
Step by Step Tulip Acrylic Painting For Beginners
There’s nothing like a bright beginner friendly tulip painting to cheer you up when you’ve got a serious case of the blahs.
Today, I’m going to share a really easy tulip tutorial that you can customize with colors that make you happy.
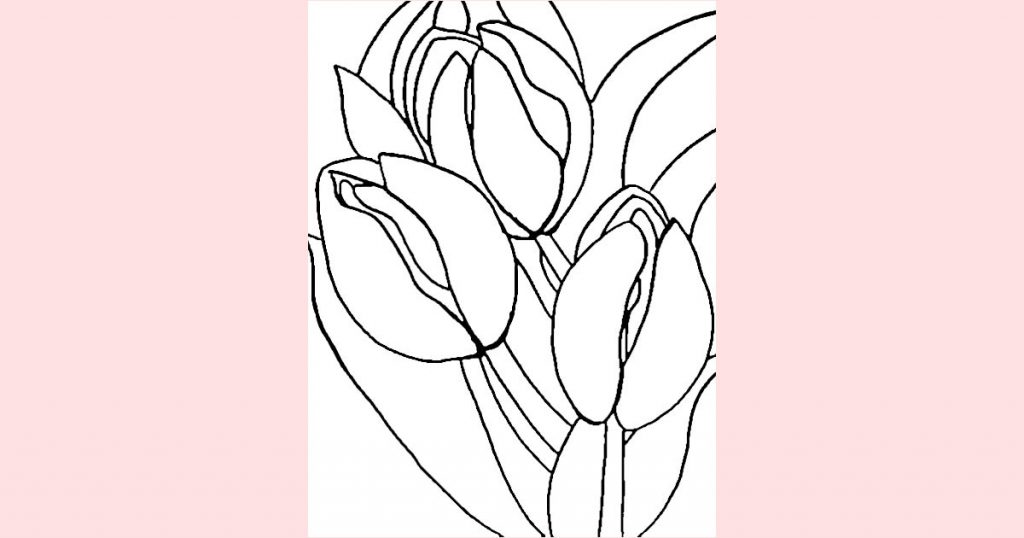
You’ll learn a super easy and fast way to paint an interesting background, and we’ll use simple shapes to sketch in the tulips. Don’t worry if you can’t draw. I have a free traceable that you can print and I’ll give you detailed instructions on how to use it to get the outline onto your canvas.
Ready to get painting? Let’s go!
Learning To Paint Flowers? Start With A Tulip Painting
If you’ve been wanting to paint flowers but are feeling intimidated, a beginner friendly tulip painting is a great choice.
When you’re sketching out your composition you’ll see that tulips are basically ovals, teardrops, or teacups. And, the leaves are stretched teardrop shapes, as well.
Armed with this knowledge, you’ll be able to get those tulips onto your canvas in no time flat!
How Shadows And Highlights Create Dimension
As we get going on our tulip tutorial, you’ll notice that all of the shapes are very simple, including the shapes of the highlights and shadows.
This is an impressionistic piece so there isn’t a lot of blending involved (Hip-hip-hooray!). We want to see a clear definition between the base color, the highlights, and the deep shadows and folds within the tulip petals.
Basically, we’ll just be using lines and dots to create depth and different directionality to the tulips. Where you place the highlights and shadows will determine if your tulip petals are turned toward the sun or away from it.
If you’d like to learn more about painting flowers, including adding highlights and shadows for dimension, take a look at my article on how to paint flowers.
Choosing Paint Colors For The Tulip Painting
You can use any paint you want for your beginner friendly tulip painting. Feel free to use whatever your favorite colors are, it’s your painting so have fun with it!
That said, you just want to keep in mind what paint color(s) you use for your background because it will have a huge impact on the “feeling” you get from the painting. This is where we start getting into the territory of the color wheel.
Ask yourself, do you want to create a dramatic piece or a calming piece?
Basically, if you use colors that are opposite on the wheel you’re going to have more drama because those colors compliment each other, meaning they make each other pop when put next to each other on a painting. Beware, though. Those same colors can turn to a lovely shade of mud if mixed so make sure that your background is completely dry before starting on the tulips.
If you want to create a soothing piece, you would stick to using the neighboring colors on the color wheel. This will create more flow that has the same feeling as a gradient.
Another option that you have is to do a black and white painting with just a pop of color.
In this case, your pop of color would be used in small amounts. The whole point is to draw the eye to that beautiful paint color.
By minimizing the amount of color used, you create drama that resembles the same drama you get from bright colors but it has a more calming effect.
If you’d like some ideas on colors inspired by nature, follow this link to Pixabay and take a look at some gorgeous tulip photos!
Also, take a moment to read my article explaining the color wheel and how you can use it for your art.
Beginner Friendly Tulip Painting Tutorial (7 Steps)!
For this tutorial, we’re going to focus on bright colors, simple shapes, and a loose painterly vibe. Don’t ever think that your artwork needs to look like a photograph for people to understand what it is they’re seeing. If that was the case, no one would buy impressionistic paintings and they are hugely popular!
Besides, if you want something to look realistic that’s what photographs are for. We want to show that we painted this. We want to see brush strokes, uneven layers of paint, and even little mistakes. All of those things together make a unique painting.
Before we begin I’ll list all of the materials I used to create this painting but feel free to use whatever you have on hand. There’s no need to skip a painting just because you don’t have the exact same materials. However, if you’d like to try to come close to what I’m using, you can read my article about substituting paint colors to get a better idea of what to use. I’ll also include basic suggestions next to each paint color.
I also wanted to challenge myself by using only one paintbrush. However, you can use as many brushes as you want and whatever brushes you feel comfortable using.
Let’s gather up our materials and get ready to relax and enjoy a bright spring tulip painting tutorial!
Materials List
- Jar of clean water
- Canvas, cardstock, whatever you want to paint on
- Piece of paper towel
- Large round brush
- Piece of chalk, a watercolor pencil, or even a regular pencil
- PDF printable of the tulip painting
- Paints Used:
- Titanium White (any opaque white)
- Rose Azo (bubblegum pink)
- Quinacridone Magenta (dark magenta that leans more violet than red)
- Cadmium Red Deep Hue (cool dark red)
- Primary Blue (vibrant mid-tone blue)
- Light Sap Green (grass color)
- Hooker’s Green Hue Permanent (dark evergreen forest)
- Indian Yellow (mid-tone yellow that leans toward orange)
- Pallet, paper plate, etc.
- Rag (to dry your brush in between colors)
- Piece of tracing paper (or parchment paper)
- Painter’s tape (or even regular tape)
- Ballpoint pen
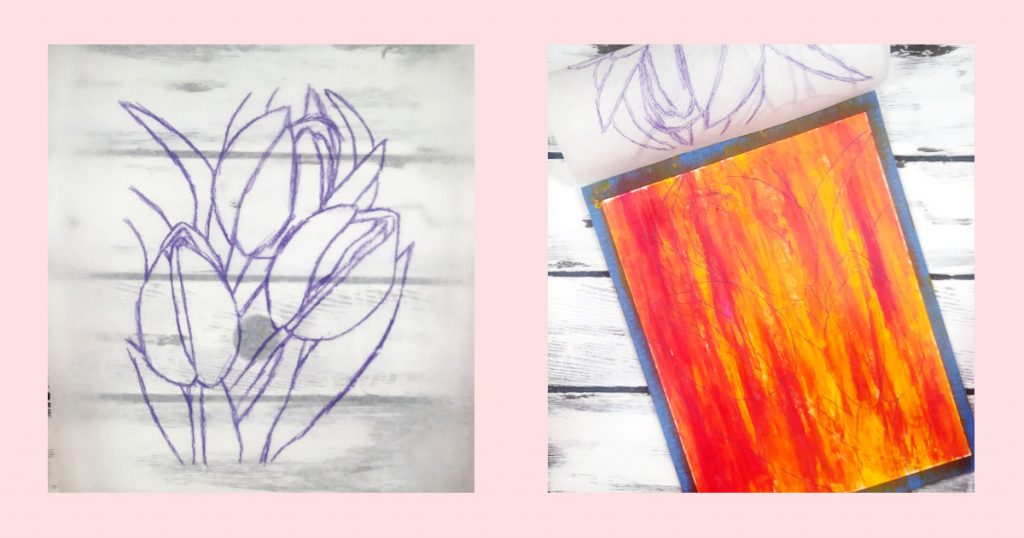
1. Paint The Background
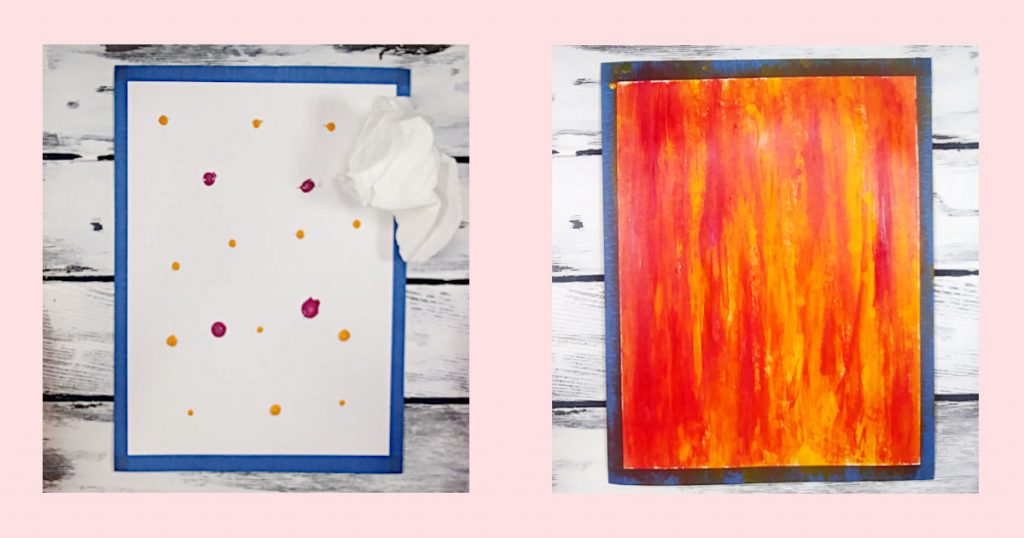
- Using your Indian Yellow and your Quinacridone Magenta put small blobs of paint all over your canvas
- Once you’ve got your blobs on your canvas, crumple up your piece of paper towel and, starting from the top, drag the paper towel down over the canvas, from top to bottom, all the way across
- You can continue to do this as many times as you need to cover your canvas and you can add more paint if you didn’t put quite enough on there the first time
- Once you’ve got that done, let it dry completely
TIP: If you want your painting to look like mine, make sure to only use a small amount of Quinacridone Magenta because it’s a very powerful color.
2. Sketch/Transfer The Tulips Onto Your Canvas
Did you print off the PDF traceable of our beginner friendly tulip painting? Great! Feel free to use the printable as a guide to sketch free-hand onto your canvas. However, if you feel like you can’t even draw a stick figure, don’t worry, I’ve got you covered!
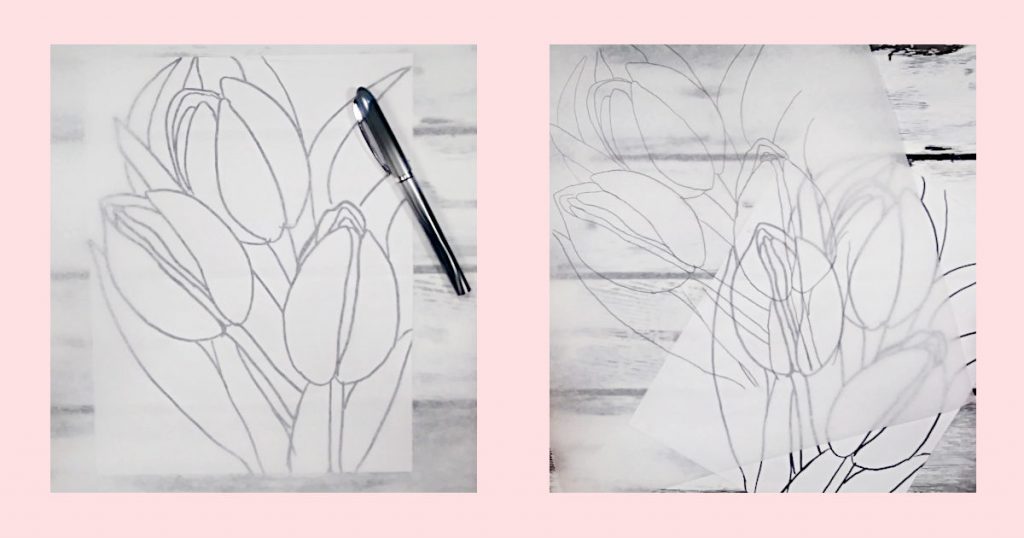
- Place a piece of tracing/parchment paper over the top of the tulip printable and tape the two together
- Using a marker, a pen, or a pencil trace the outline of the tulip PDF onto your piece of transfer/parchment paper
- Undo the tape and set the printable aside. You should now have a piece of tracing paper with the image of the super duper beginner friendly tulip painting on it!
- Flip your tracing paper over and grab a watercolor pencil or a piece of colored chalk (make sure that the pencil or chalk is a color that you’ll easily be able to see when transferred onto your background)
TIP: I prefer using watercolor pencils because I find them easier to transfer and easier to see. Plus, if you make a mistake, you just have to take a damp paintbrush and use it like an eraser to get rid of any naughty bits.
- Okay, so now, you’re going to flip your piece of tracing paper over so that the side with chalk or watercolor pencil is facing down
- Place the tracing paper over the top of your painted background and secure it with tape at the top
TIP: You could put tape on all four sides but I prefer to leave the sides free so that I can periodically lift the tracing paper to check that the lines are actually transferring and that all of the lines match up
- Using a ballpoint pen (using a ballpoint pen is very important because you need something that you can press down firmly onto the transfer paper), firmly trace all of the lines onto your background (every once in a while, lift the tracing paper to make sure that it’s actually transferring to the canvas)
- Once you’re finished, and you’ve checked to make sure all of your lines transferred, remove the piece of tracing paper from the canvas, and Voila! You should now have a sketch of our groovy beginner friendly tulip painting!
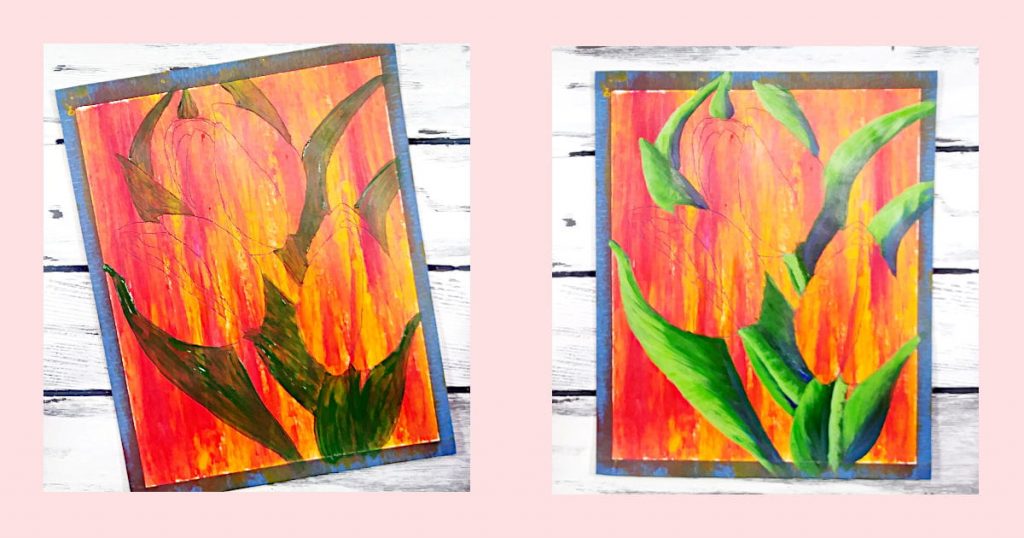
3. Block-in The Tulip Leaves
- Using the darkest green paint on your palette, and a damp round brush, paint in your tulip leaves and stems
- Start with the leaves first and then paint in the stems, making sure that you have a little line in between your leaves and your stems if they overlap so that you don’t lose sight of where the end of your stem and your leaves begin
- Allow the blocked in leaves to dry
TIP: Don’t get too particular about brush strokes. You’re basically giving yourself a “bookmark” of where your leaves and stems are and we’ll be adding lots of layers. So, it doesn’t really matter if, at this point, things look a bit messy and the paint is patchy.
4. Add Highlights To The Leaves
Since we’ve already blocked in with the darkest green paint, we can move on to adding highlights on top of it. Because we’ll be adding lots of layers, any patchiness in your shadow color will eventually disappear.
- Using your lighter shade of green, start imagining where your light source will hit the tulip stems and leaves
TIP: So in my painting, I imagined that the light source was coming from the left-hand side but I also had a secondary light source that sort of came around toward the front of all of the tulips. All this means is there will be more highlights other than just on the left side of the petals, stems, and leaves. Having more than one light source keeps things bright because you’ll have a lot more highlights than you will shadows.
- Load your brush with the lighter green paint and, this time, start painting your stems so we can separate them from any leaves that cross their paths
- When adding in your highlights, hold your round brush more like you would if you were buttering toast instead of like you’re using a pen, which is the typical way most people hold a paintbrush
- Lightly drag your paintbrush, starting from the side of the stem that would get the most light leaving some of the dark green shadow paint to create the illusion that the stem is rounded and more distant from the light source
- Follow the same process for your leaves but make sure to leave more shadow near the base of each leaf to show that the leaf curls inward on itself
- Continue to play around with your highlights and shadows until you’re happy
TIP: If you want your stems and leaves to be a bit brighter just add a tiny bit of yellow to your lightest green paint and slowly add white until you’ve got a paint mixture that you like.
TIP: To make some of your leaf shadows even darker, add a bit of Primary Blue (I also added a bit of white to my Primary Blue and just put a few strokes of it in those really deep shadows because I wanted to have a little bit of something unexpected and a fun pop of color).
TIP: If you feel like experimenting with shadows and highlights on your leaves, try placing some shadows next to your highlights on the leaves. It will create the illusion that your leaves are curling inward a bit.
5. Blocking-In The Tulips
Before we get going with this step, take your Cadmium Red Deep and mix it with Quinacridone Magenta, making sure you’re heavier on the Magenta side. This will be the deepest shade of the tulips.
You can also add a bit of Pink Azo to cool the color down even more if you want but don’t add it to your deepest shadow color.
As you can see from the photo above, I like to do my tulips in parts. What I mean by that is, I figure out which part is going to be the lightest, which part is going to be the darkest, and all of the in-betweens. After that, it’s just a matter of adding lighter colors for the highlights. Since you’ve already established which tulip petals will be hit by the light source, you’ll just continue to slowly lighten each section until you’re happy with it.
If you were to block in the petals in the same way as the leaves and stems, you’d lose all of those wonderful layers of petals.
Go ahead and block in all of your tulips, working on one flower at a time so you don’t lose your train of thought with how the light is hitting that particular tulip.
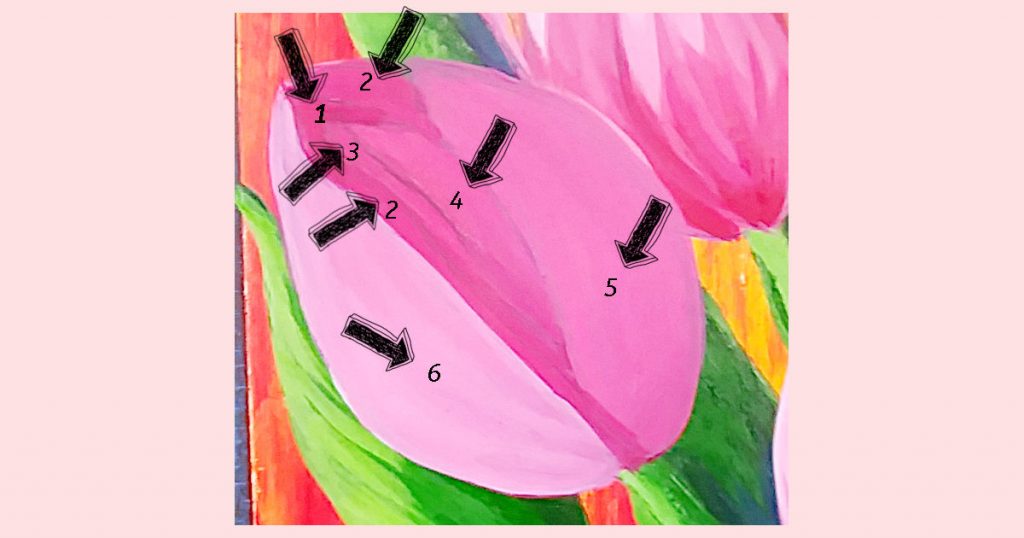
6. Adding Highlights For Shape And Dimension
This next step is really fun because you get to play with brush strokes!
During this step, you’re going to want to keep your round brush loaded with a bit more paint than you might normally because we’re going to do a bit of wet on wet blending.
Let me say this loud and clear for the people in the back, we are going to keep our shapes simple! We will be using only lines and dots to create shape and dimension! Okay, now that I’ve got that out of my system, let’s get started on the highlights.
- You’re going to want to focus on one flower at a time so I suggest starting on the first flower in the back
- You’ve already blocked in your gradient effect to represent which petals are closer to the light source, so now you’ll just continue to lighten everything
- You can use as many variations of the pink color as you want you just remember that you shouldn’t go darker in any spot unless you’re wanting to deepen a shadow
- Spots that would be deep in shadow are near the base of the flower where it hits the stem, on the petal that’s farthest from the light, and the interior of the petals
- As you can see from the finished painting, some of my lines are very straight and some of them are curved but all of them are very expressive (I used curves to show maybe a fold in a petal or where it may curl in on itself)
- Play around with your lines to see what kind of illusions you can create with them (thicker lines where you want to show a lot of light and thinner lines where you just want a bit of light)
- The more you press down on your paintbrush, the thicker the line will be
- Remember to keep your lightest highlights near your light source
- Allow your beginner friendly tulip painting to dry completely because, next, we’ll be doing a bit of glazing
TIP: You can always let everything dry and paint over it if you don’t like how things are going.
TIP: If you end up getting carried away with your paint, and you end up with just a big oval shaped blobby tulip, you can always go back to your traceable, add a bit more chalk or watercolor to the back, tape it down over your painting (once it’s completely dry!), and retrace the tulip onto the canvas.
Feel free to copy exactly the way I did my brush strokes or you can go your own way with it. Keep at it until you’re happy but don’t move on to another flower until you’ve finished the first one.
I find with this type of painting it’s better to stay in one area and get that completely finished before moving on to another area. Otherwise, it’s kind of like you’re trying to see the trees through the forest…or the forest through the trees…. Wait, what’s that saying? Oh, you know what I mean!
TIP: If you’re having a hard time seeing how things are coming together, take a photo of your tulip painting with your phone and walk away for a few minutes. Once you’ve given your brain a bit of a break, take a look at the photo of your beginner friendly tulip painting. It’s surprising how easy it is to see where something is missing, or messed up, when you look at a photo instead of the actual painting.
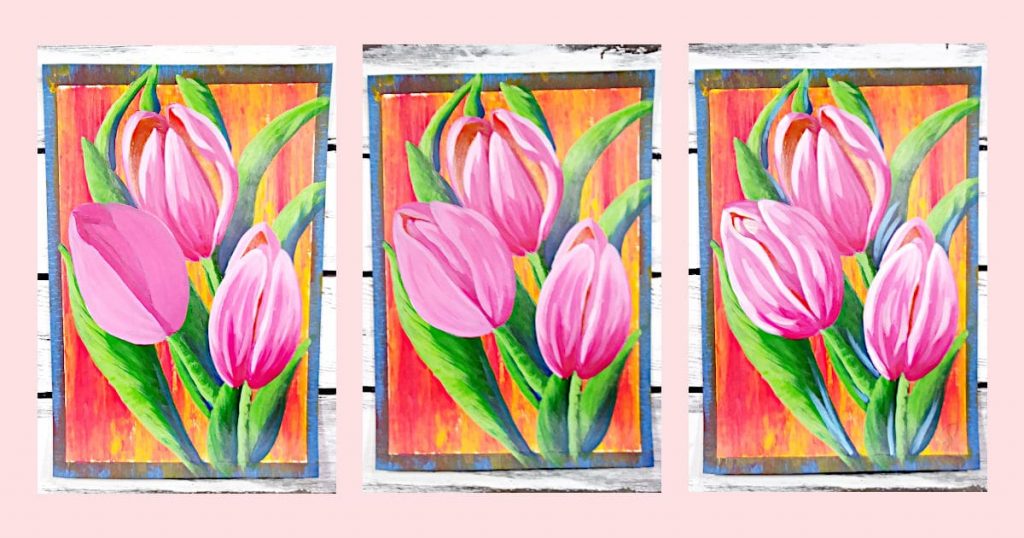
7. Add The Final Touches
At this point, you could call it finished and it would be beautiful! But, if you really like the glow that I achieved on the inside of each petal, read on.
- Decide where you’d like to create the illusion of a bit of transparency in a petal
- Load your damp round brush with a bit of your yellow paint
- Add a thin layer to the inside of the tulip petals that you’re trying to create the look of diffused light shining through the petal
- Let that layer dry
- Keep adding layers until you’ve got the glow just right
TIP: If you find that you went too bright or the glow just doesn’t look right, no biggie. Just go back in with your dark Cadmium Red Deep and Quinacridone Magenta mix and paint over it. That will tone the glow back but it won’t take the yellow out completely. You can play with this and adjust as much as you want.
Now is the time to add anything that you feel your painting needs. Add more blue to your leaves, or maybe you were a bit heavy-handed with your dark pink and you need to add more highlights back in, or change the shape of a leaf or tulip.
Play with your brush strokes and colors. Remember, it’s just paint! If you don’t like something, you can always go back and transfer the traceable over the top and start over.
Don’t forget to sign your masterpiece!
Wrapping Up Our Fun DIY Tulip Painting
I had a blast designing this beginner friendly tulip painting for you and I hope you’ve had just as much fun trying it out for yourself!
When doing impressionism the trick is to stop seeing objects as a whole. Instead of seeing the flowers, stems, and leaves, start looking at just the shapes that make up those objects.
Tulips come in many shapes including a teardrop shape, a teacup, and an oval.
On top of that, each highlight and shadow is also a shape. So, if you can train your mind to see the highlights and shadows as physical shapes you’ll be well on your way to becoming a master of impressionism!